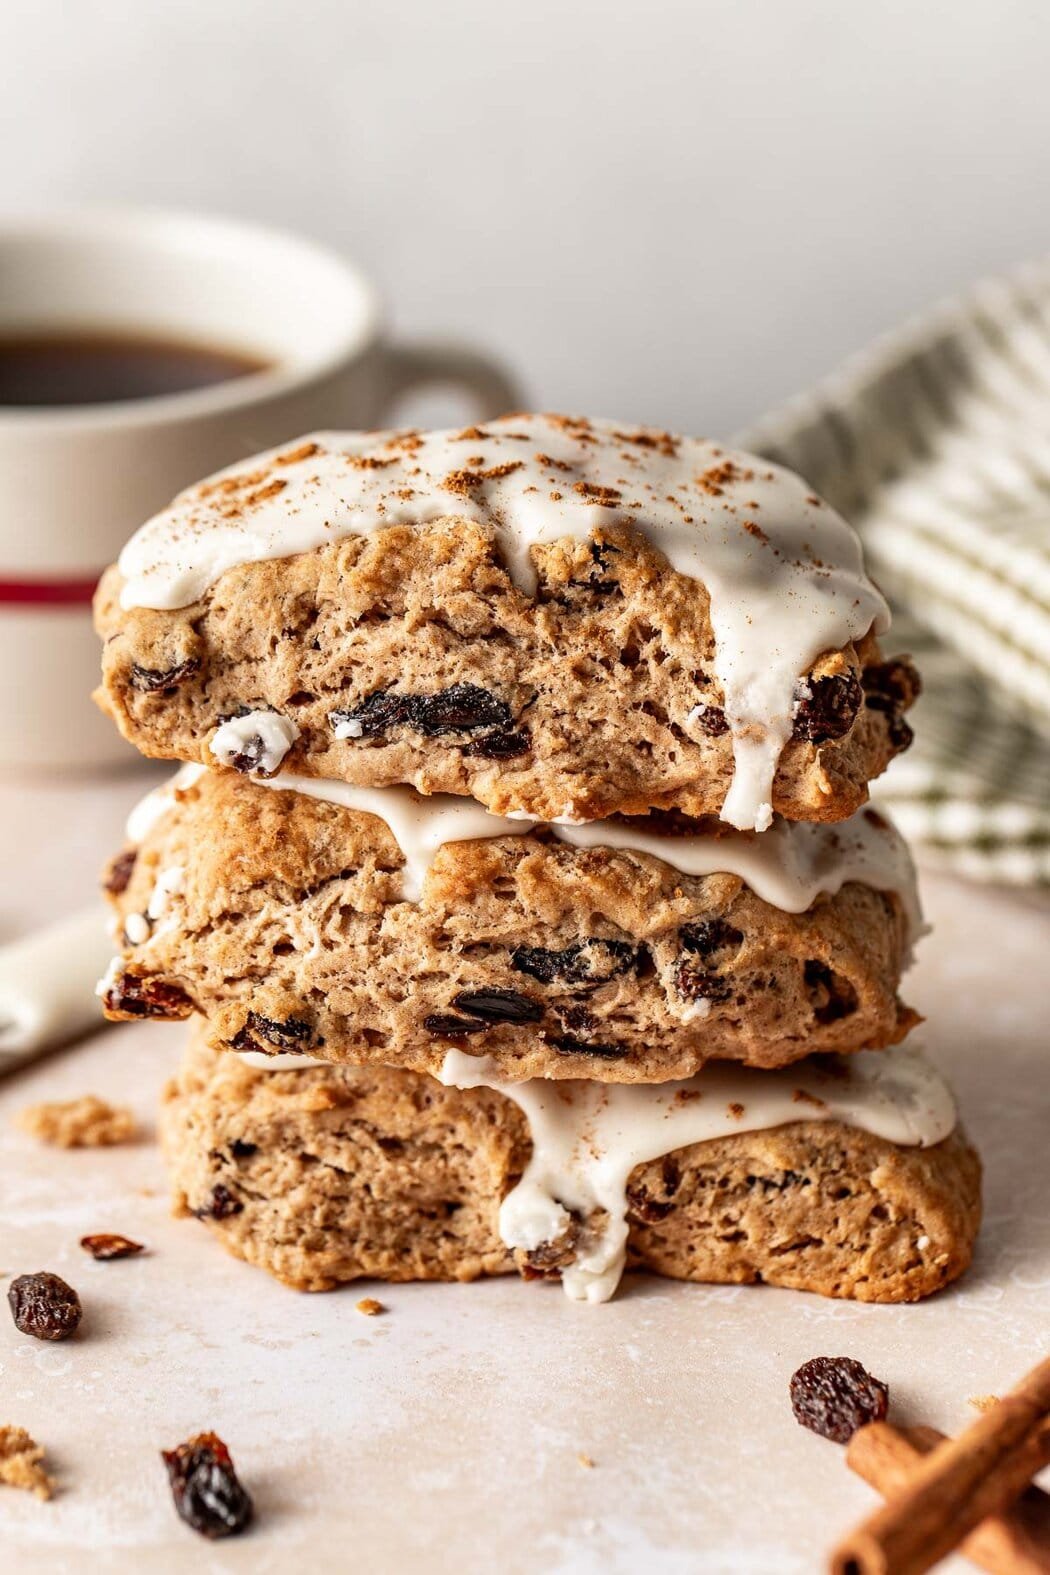
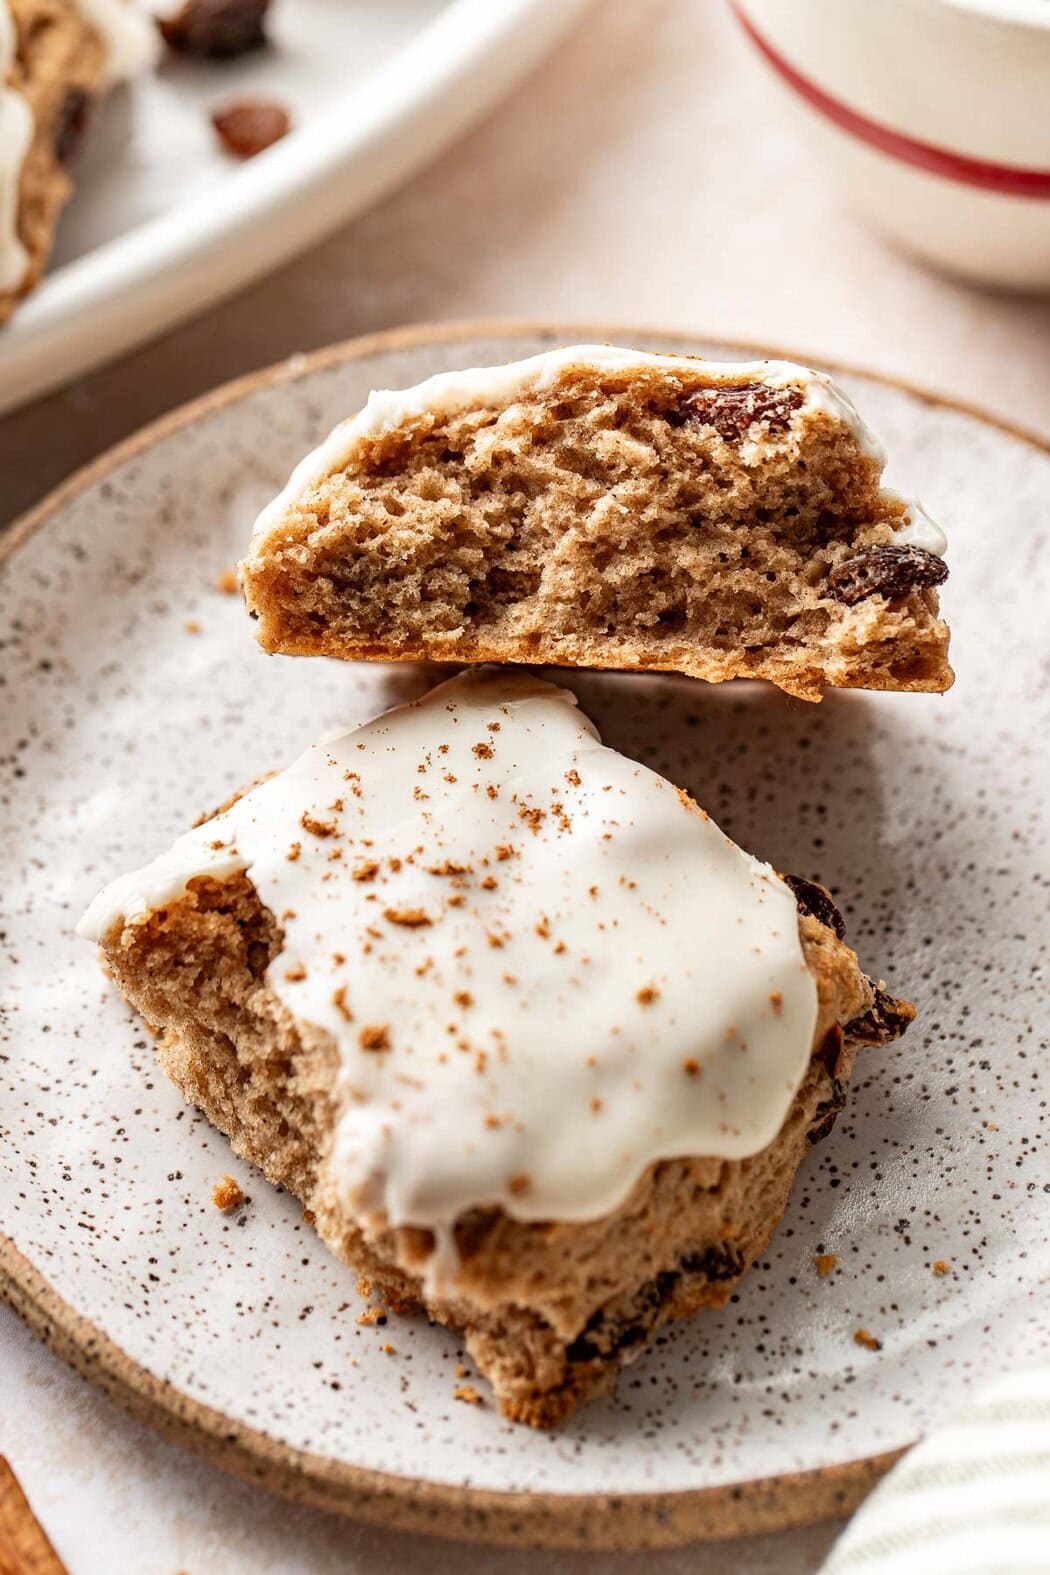
As a self-proclaimed ‘biscuit queen’ who’s been perfecting my recipe and technique for decades, I drew upon my experience as a Hardee’s baker to create this copy cat recipe Hardee’s cinnamon raisin biscuit. It’s a bit lower in fat and sugar than the original but every bit as deliciously nostalgic and still studded with plump raisins and generously drizzled with sweet icing. I think they’re the perfect accompaniment to a strong cup of coffee and easy enough for bakers of all skill levels to make at home.
Easy Hardee’s Cinnamon Raisin Biscuits At Home
My first job was baking biscuits at the Hardee’s restaurant in my hometown. I was only 14 years old but already knew how to make flaky buttermilk biscuits and I didn’t mind waking before dawn, so it was the perfect job for me.
The cinnamon raisin biscuits were officially retired from the Hardee’s menu in 2002, but in recent years, they’ve made a limited time return for the holidays. I was missing them (and so was my Dad!) so I recreated a real food version based on my early memories of these comforting biscuits. Using simple, wholesome ingredients, these homemade sweet biscuits can be enjoyed any time of year.
Recipe Highlights
Made from real food ingredients: The original recipe (which I’ve recreated from memory) used hydrogenated oils in the form of vegetable shortening and cinnamon chips that were made with palm oil and flavorings. My version uses real butter and relies on a pantry staple for their warm cinnamon flavor.
Lower in fat and sugar: ’ve spent years perfecting my technique for flaky, tender biscuits made with less butter and sugar. They’re still not a low calorie food, but these modifications — along with a higher proportion of naturally sweet raisins — has earned them my family’s stamp of approval.
Created with love: Creating this recipe has been a labor of love for me and the sequel to The Best Biscuits story about my very first job making biscuits similar to these as a baker at my hometown Hardee’s.
Ingredients To Gather
Here are some of the key pantry and refrigerator ingredients needed to make a batch of these biscuits.
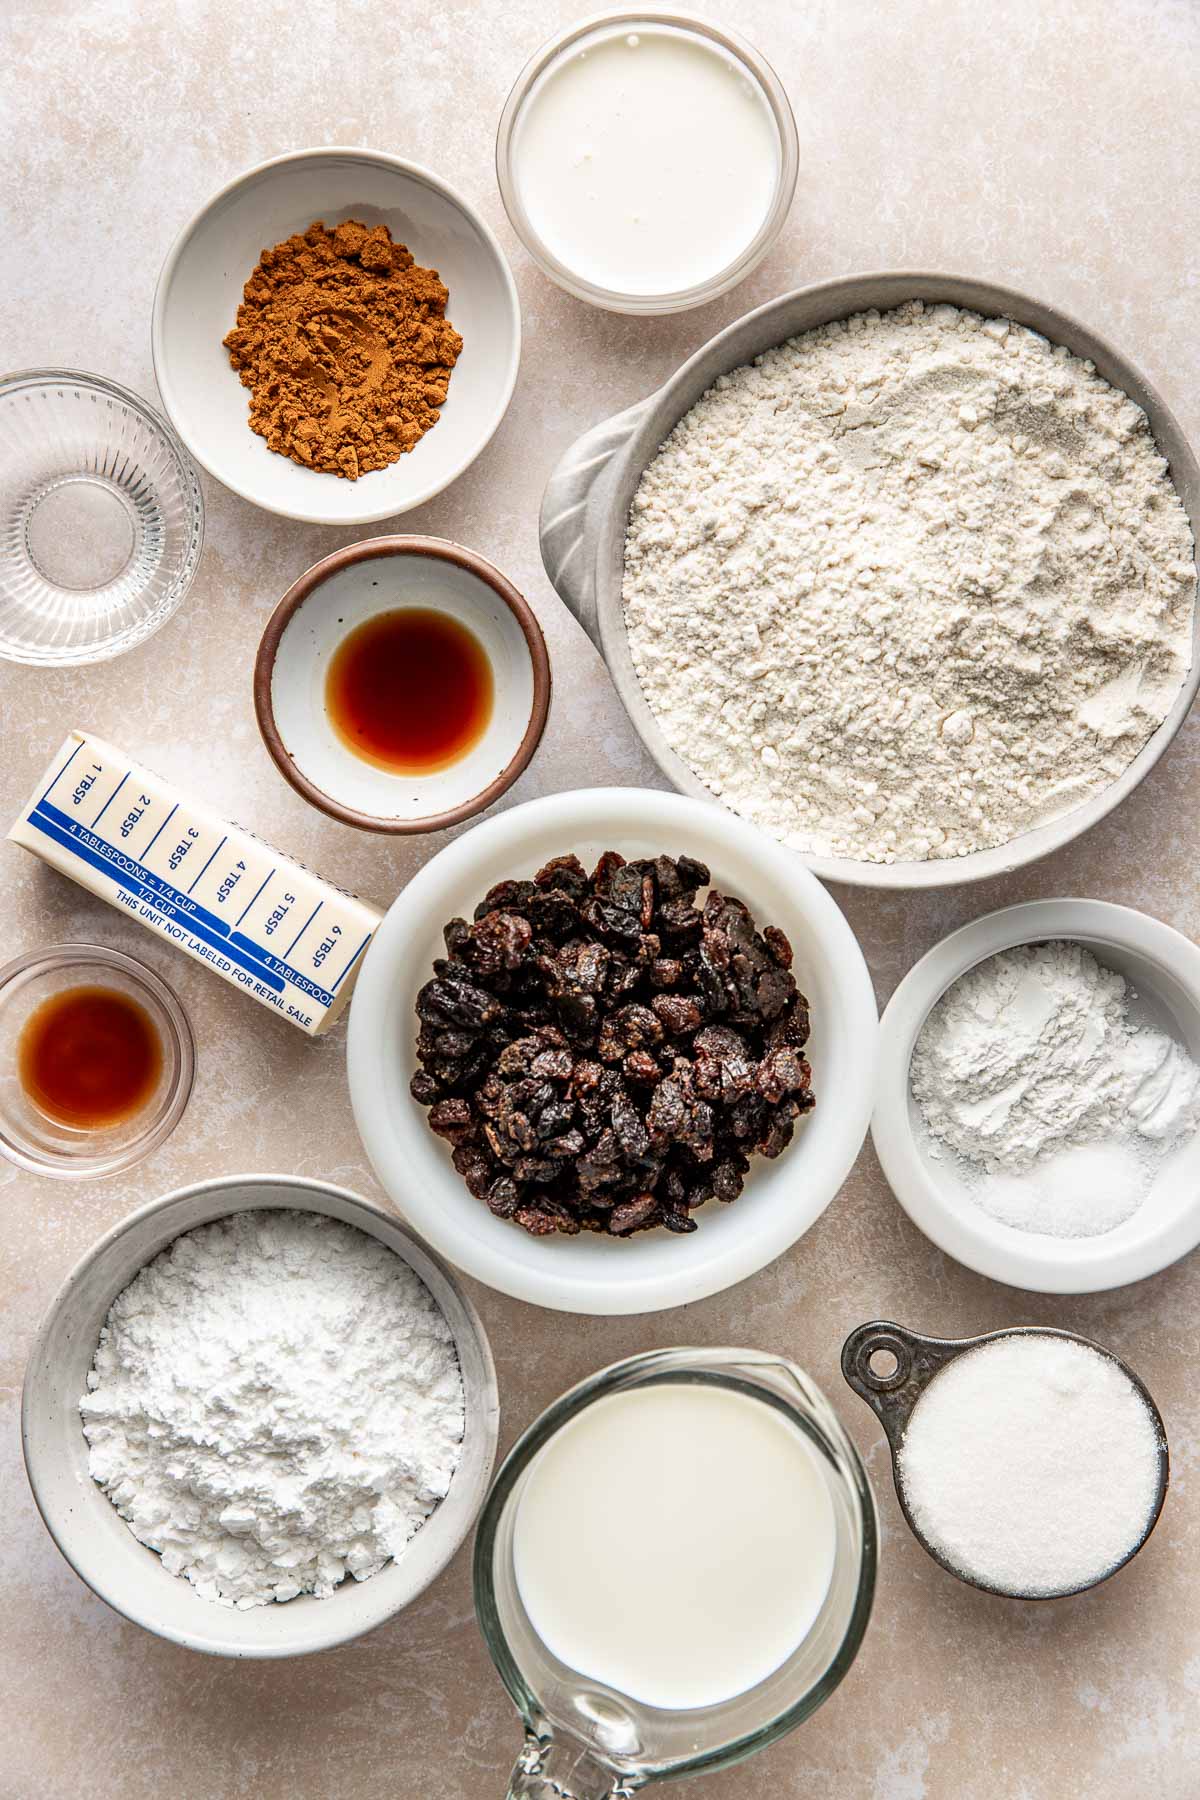
- Flour: Any brand will work but my go-to for consistently excellent results is King Arthur All-Purpose Flour in the red bag. See below for my notes about using gluten-free flour in this recipe.
- Cold butter: Unsalted butter is the best bet for baking because it lets me adjust the saltiness by adding more salt if needed. Since this is a sweet biscuit I always reach for unsalted butter straight from the fridge so that it’s cold. If I’m baking on a hot day or the kitchen is unusually warm because my oven has been on for a while, I’ll pop my stick of butter in the freezer for 10-15 minutes before grating it. Melted butter has no place in a biscuit recipe, so be sure to keep that butter cold.
- Whole milk: I typically use whole milk when making biscuits because the extra fat increases their tenderness. However, 2% milk also works well and so does cold buttermilk if you’ve got it on hand. If using buttermilk, omit the vinegar.
- Granulated sugar: While it may be tempting to reduce the sugar even more, I’ve found that this is the minimum amount of sugar needed to give these biscuits a tender bite and just the right amount of sweetness.
- White vinegar: Mixing white vinegar with milk is an easy, cost-saving alternative to buttermilk. The acidity of the vinegar reacts with the leaving agents to give the biscuits a lift in the oven.
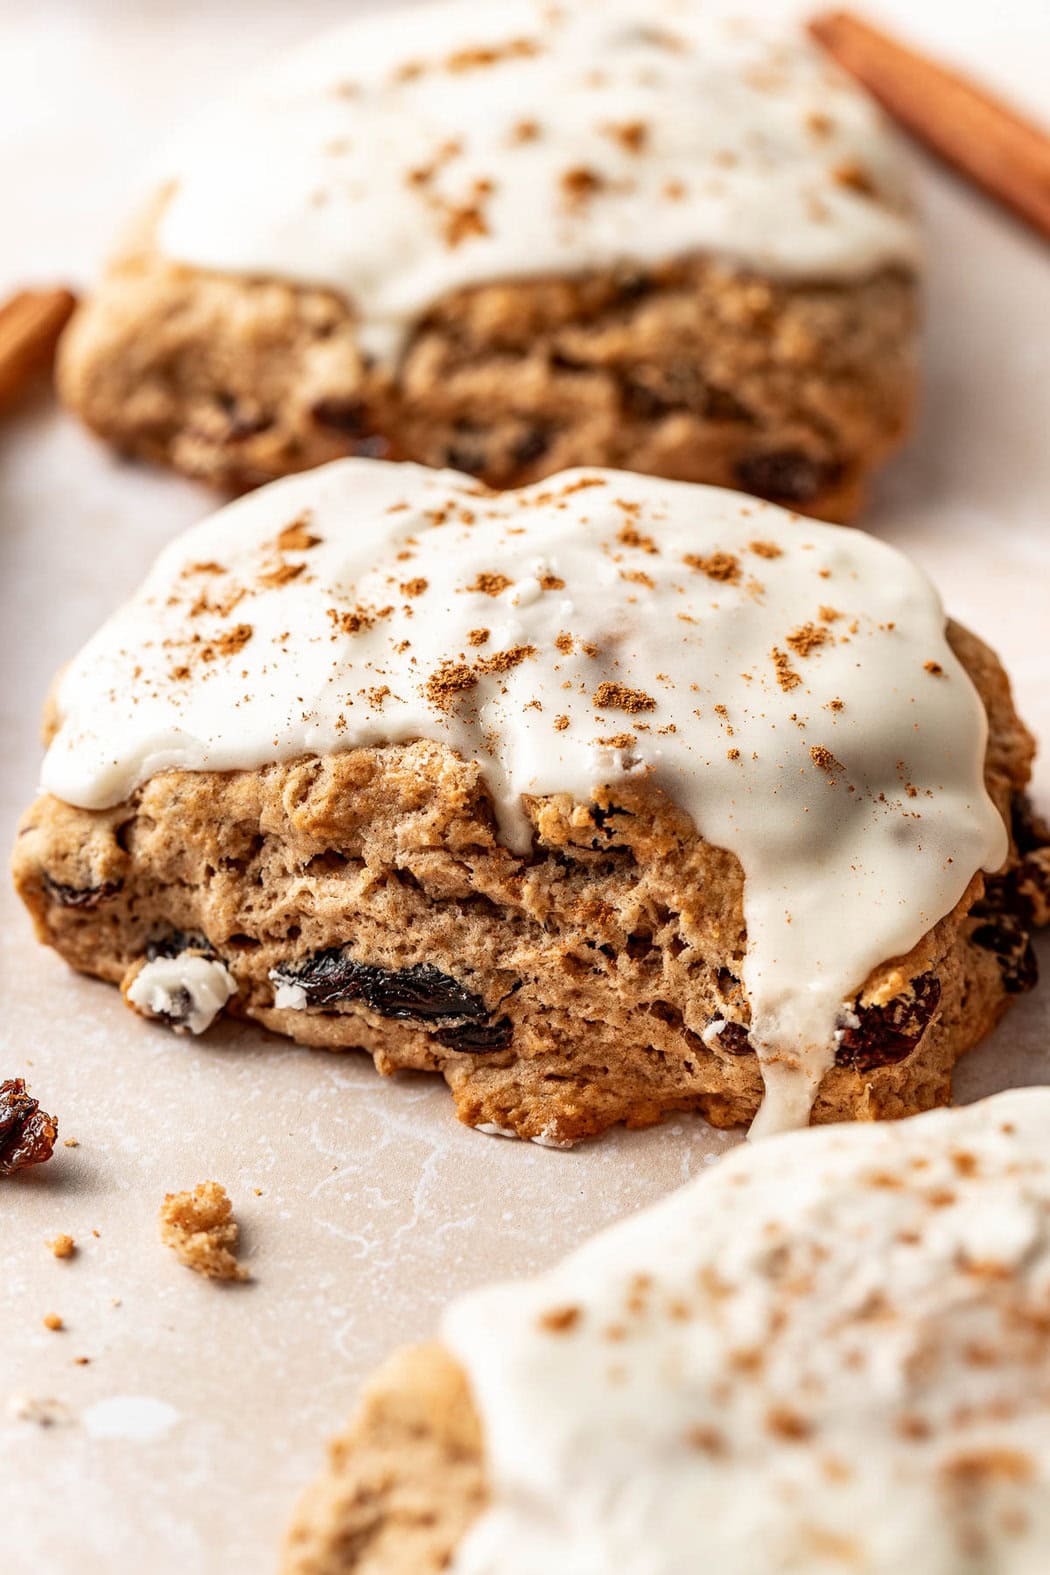
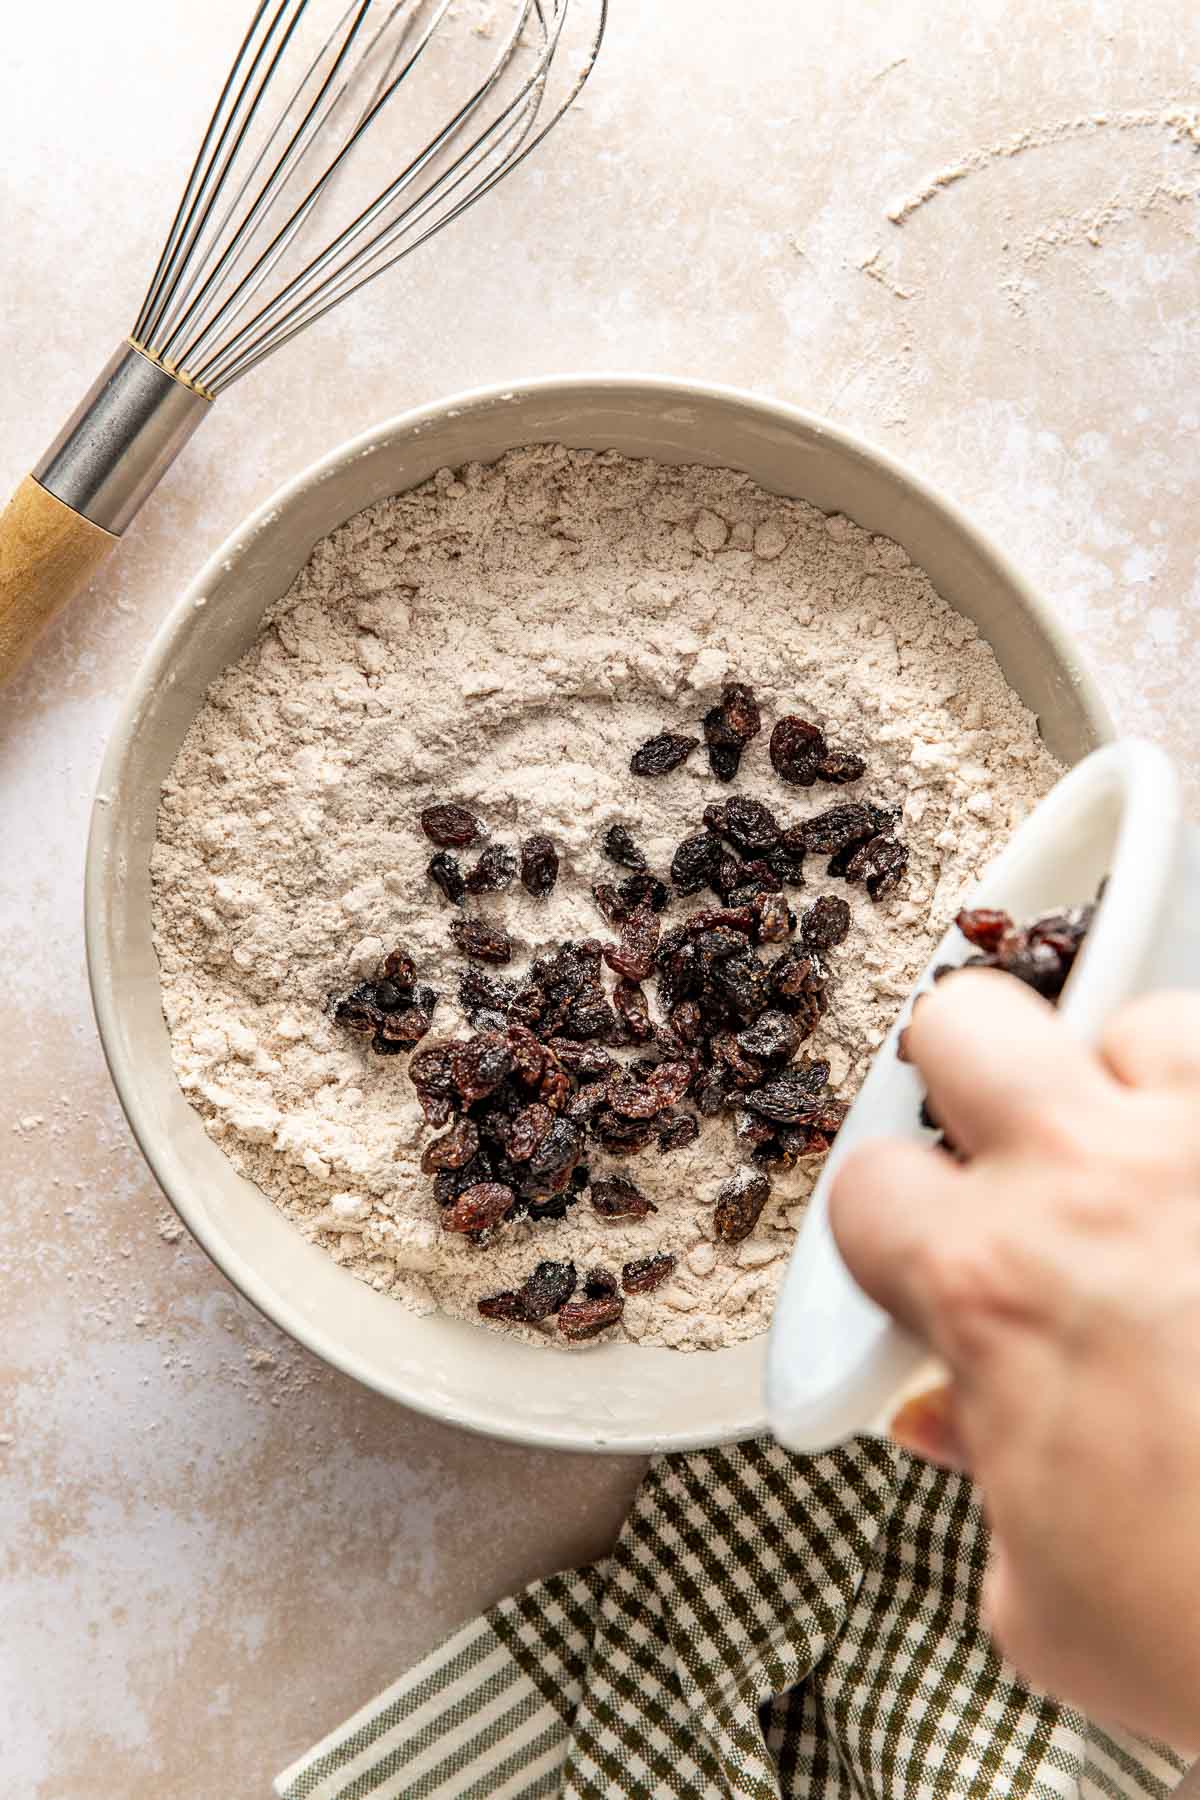
- Raisins: Since I’m all about saving time and skipping the step of soaking, draining, and wringing out the raisins, I recommend using fresh raisins that are soft and plump. Save any dry and shriveled ones for this delicious morning oatmeal.


Suggested Tools & Equipment
These are a few of my favorite tools that I reach for every time I bake a batch of biscuits. This recipe doesn’t require any appliances like a food processor or mixer. Instead, these are hand-powered, old fashioned biscuits just like Grandma used to make, which makes them even more satisfying.
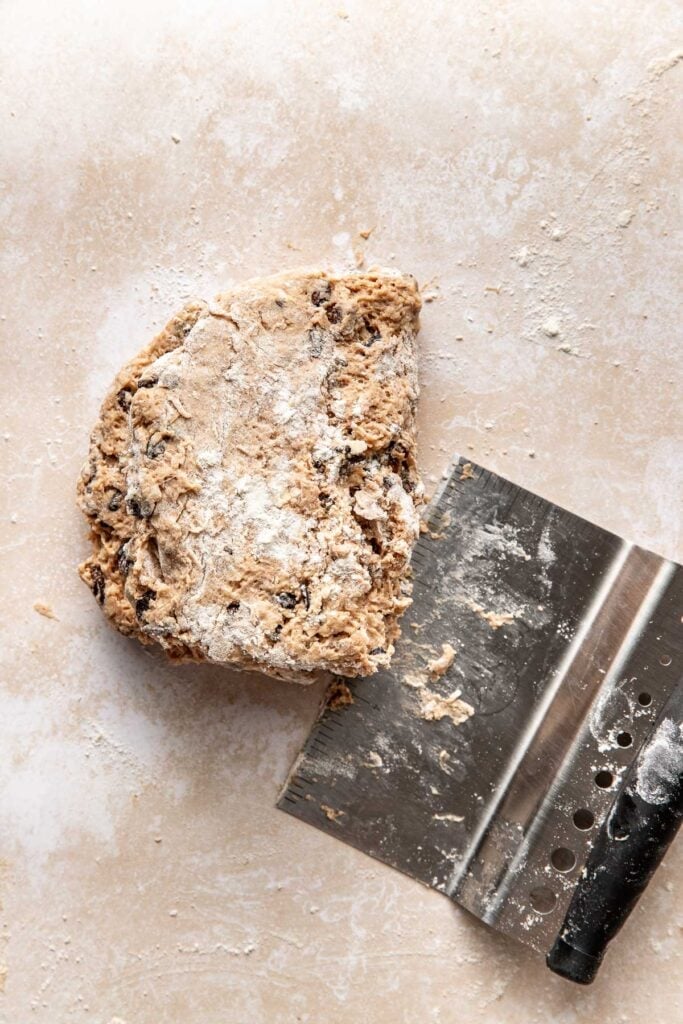
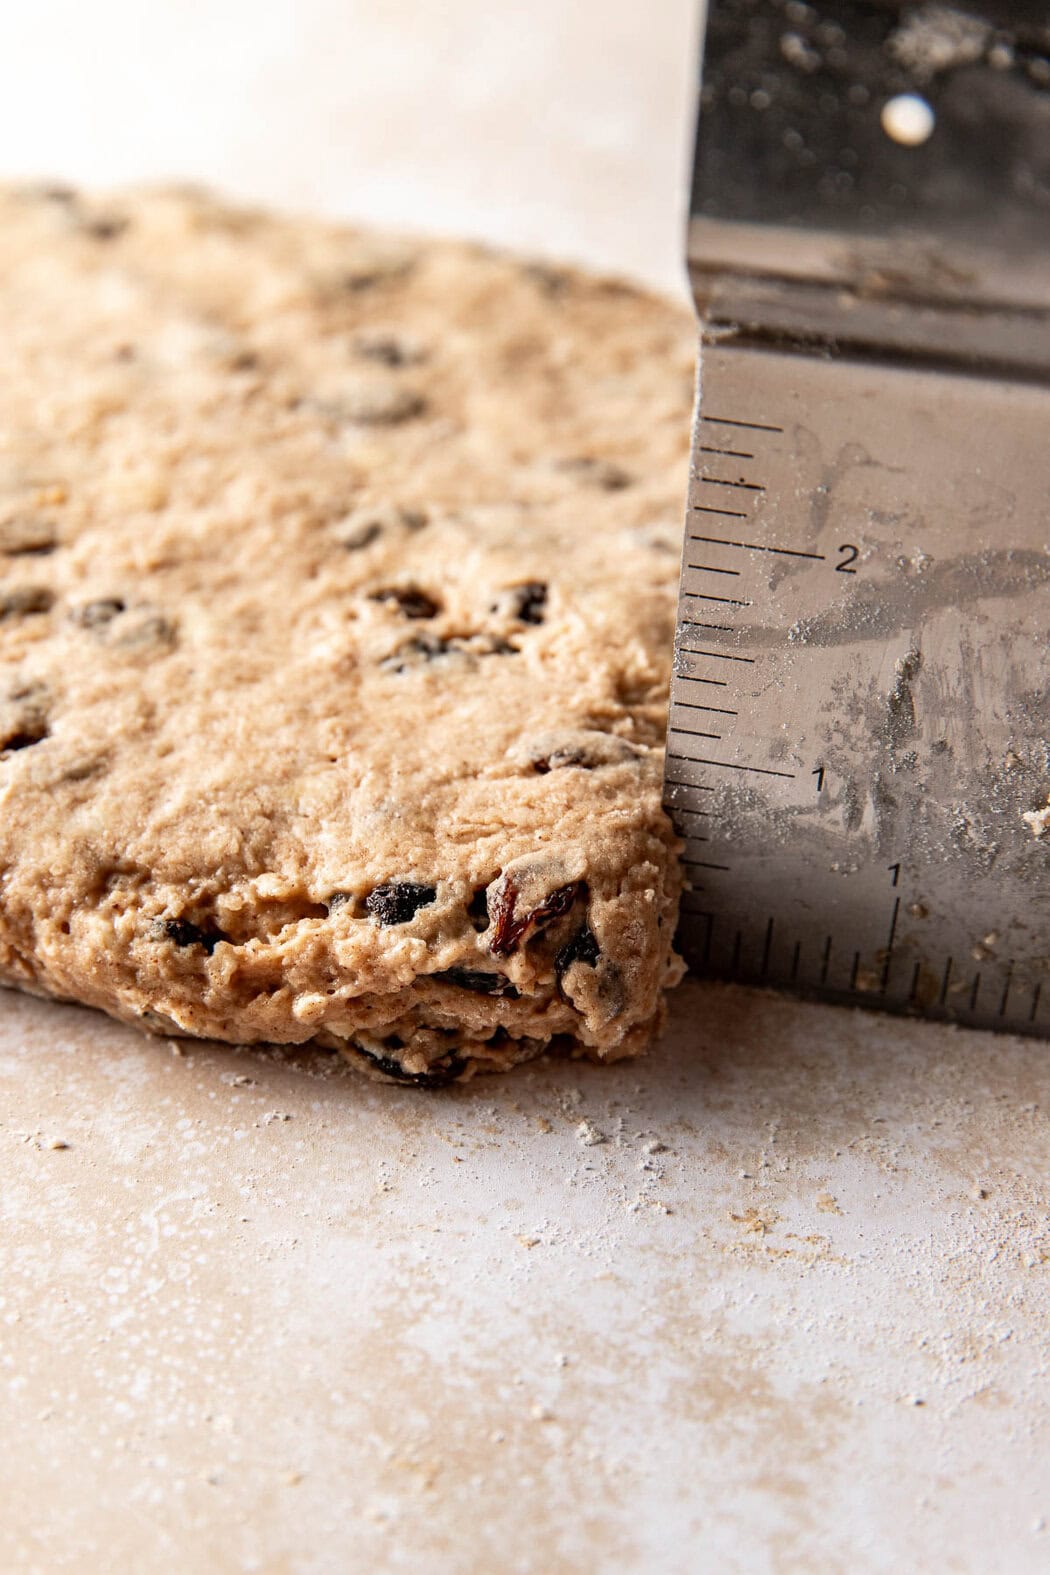
- Bench scraper: I use my bench scraper so often that it has earned a spot in my uppermost utensil drawer. It’s great for cleaning flour and bits of dough off the countertop and shaping and cutting the dough since these biscuits are cut into squares not rounds using a biscuit cutter. Mine has a measuring tool marked that makes it easy to get biscuit dough just the right thickness.
- Kitchen scale: I’ve found that my $10 digital kitchen scale is one of the most valuable tools in my kitchen when it comes to baking. Weighing flour and other dry ingredients (instead of the scoop-and-measure method) ensures accuracy and eliminates the need to dirty extra measuring cups and measuring spoons.
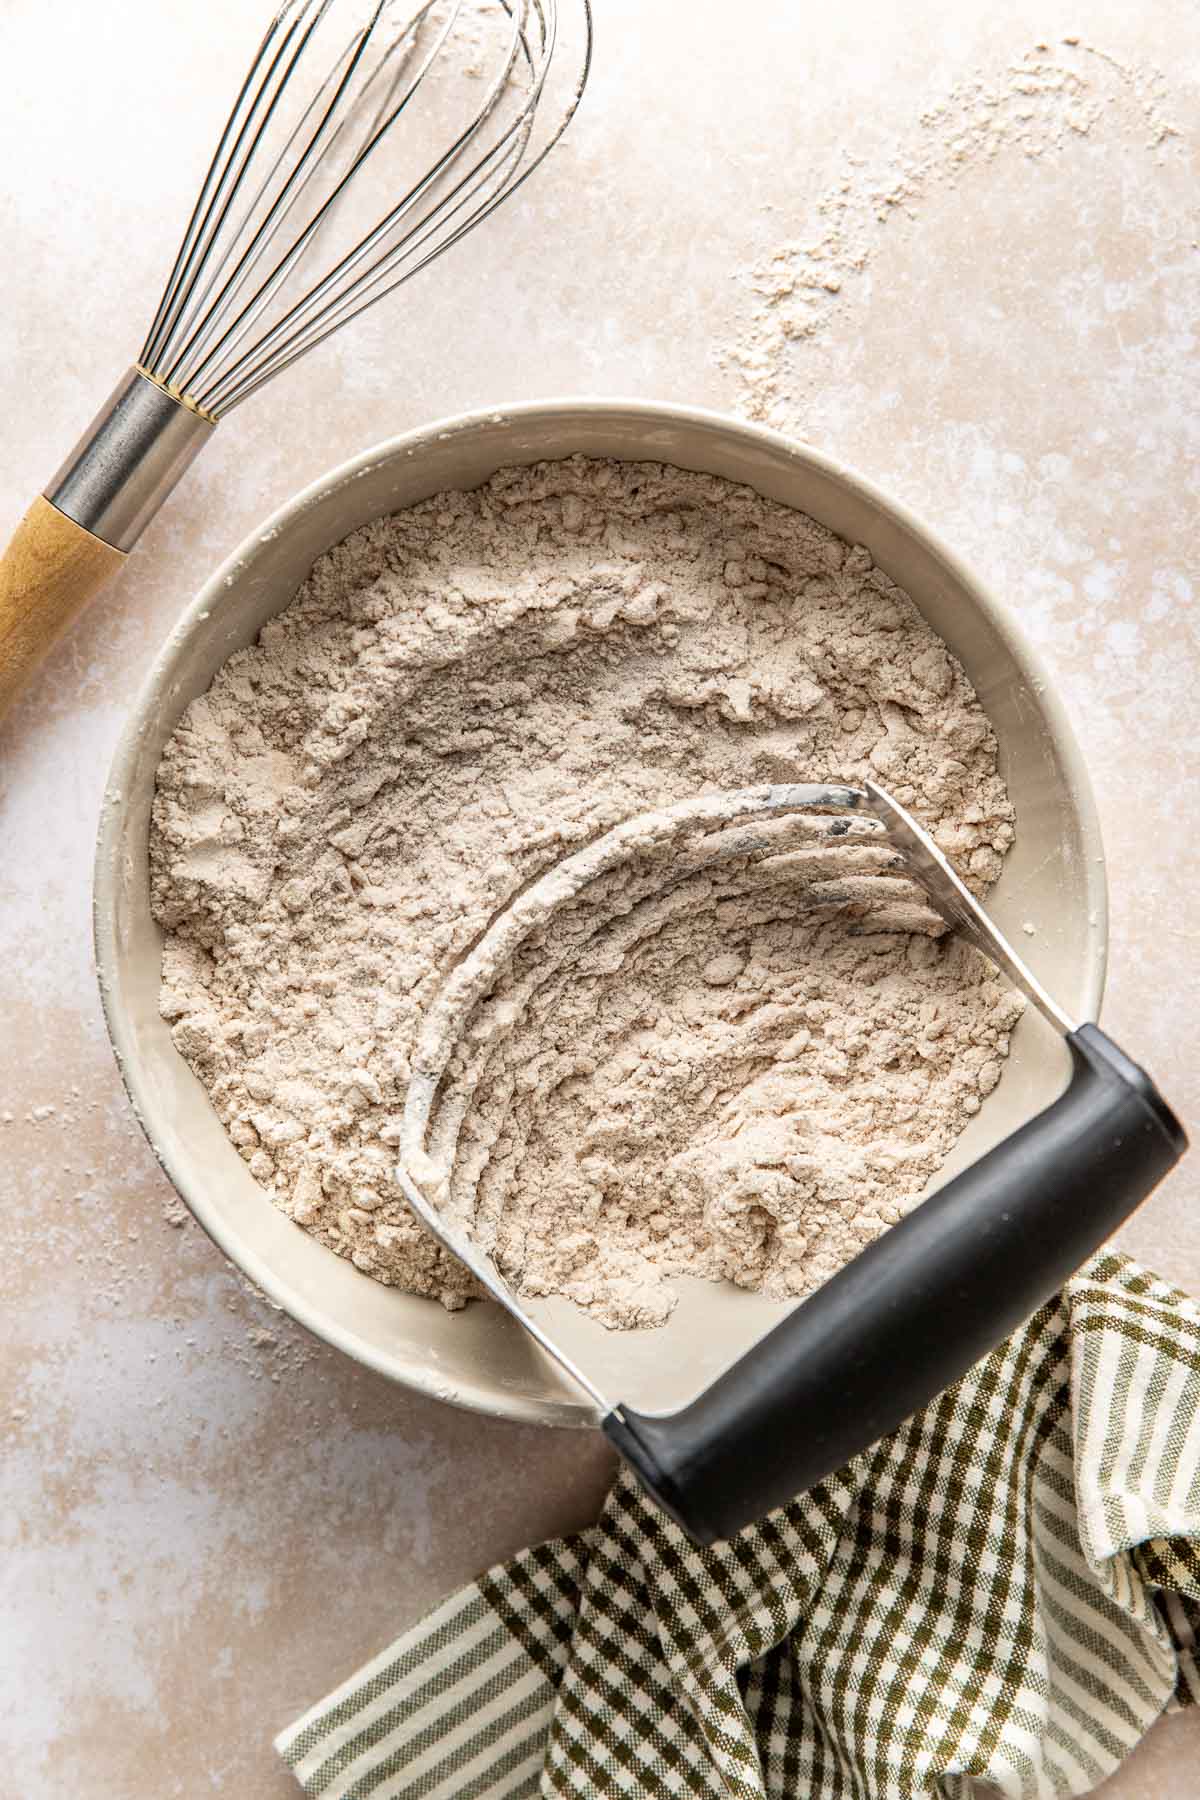
- Pastry blender: Also called a pastry cutter, this tool makes quick work of cutting cold butter into flour which is essential for flaky biscuits and pie crusts when making blueberry cobbler, chicken pot pie, homemade apple pie, or this berry galette.
- Baking sheet: Any size baking pan will work but I almost always grab a quarter sheet pan for this recipe and line it with parchment paper or a reusable silicone baking mat.
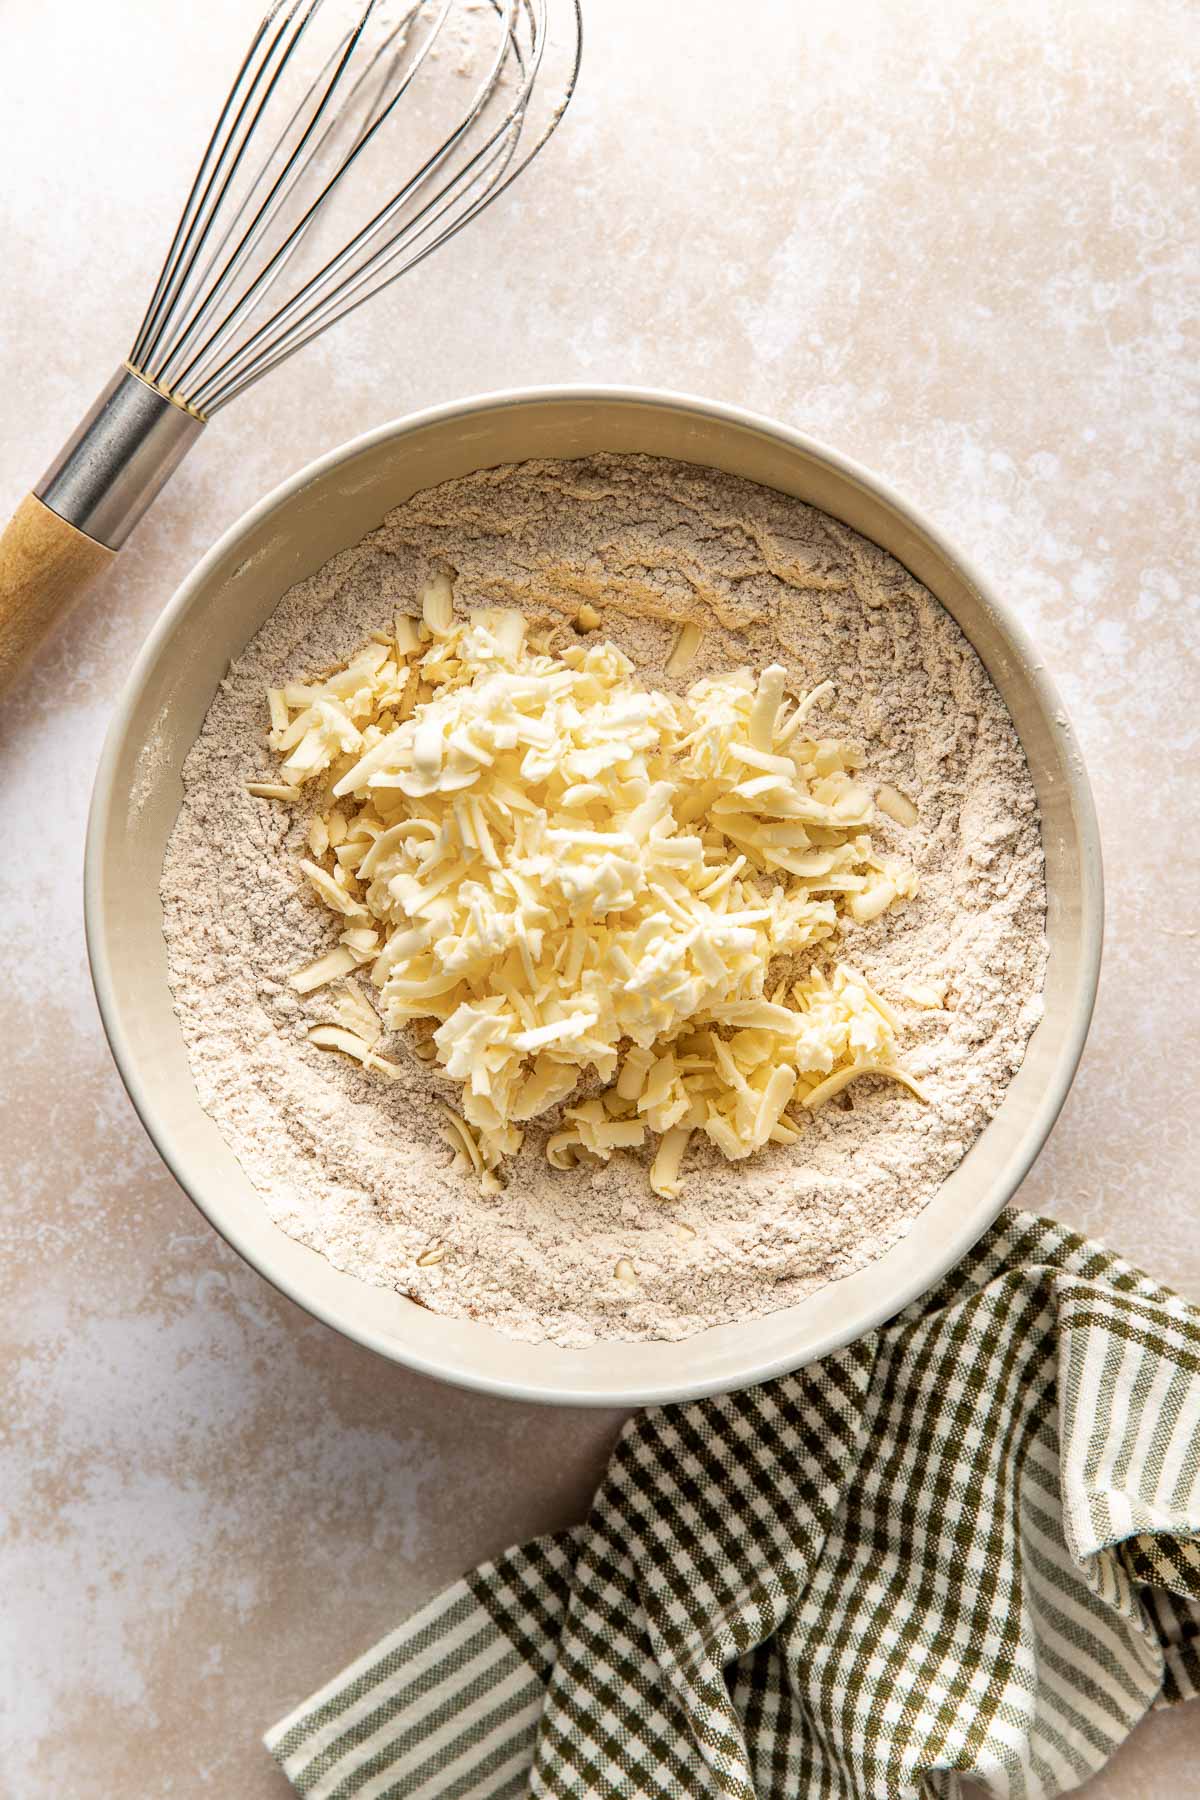
- Box grater: This stand-up grater typically used to grate cheese or zucchini makes quick work of grating a stick of butter to create a mound of thin buttery curls that are easy to cut into the flour so that it’s evenly distributed ensuring tender cinnamon biscuits.
My time-tested method for perfect no-fuss biscuits
Over the years I’ve perfected my method for making homemade biscuits to make them as simple and unintimidating as possible, even for beginner bakers. I’ve included a step-by-step photo tutorial to make it easy.


Fold, Don’t Knead
Avoid the urge to knead the dough. Excessing handling of the dough such as kneading or overstirring in the mixing bowl will result in tough biscuits. So take it easy and do just enough to incorporate the flour into the dough with four rounds of patting and folding.
For serving size and the complete directions and ingredient amounts, scroll down to the recipe card below. All of our recipes include the nutrition analysis, listing calories (kcals), protein, carbohydrates/carb, fiber, sugar, sodium, cholesterol, and more per serving.
Make It Gluten-Free
I’ve tested this recipe using Bob’s Red Mill Gluten-Free Baking Flour with excellent results. To make these cinnamon raisin biscuits gluten-free, simply replace the all-purpose flour with gluten-free flour in a 1:1 ratio. Stirring the flour before lightly spooning it into the measuring cup and scraping off any excess flour with a knife will help ensure there’s not too much flour, which could result in dry, crumbly biscuits. The best method, however, is the weigh the flour and use the exact measurement provided in the recipe card.
Frequently Asked Questions
Be sure to preheat oven fully before baking and use an oven thermometer to check the accuracy of the oven temp. The temperature in many ovens can differ from what’s displayed on the control panel by as much as 10-25 degrees, which can have a big impact on recipe results. A cooler than expected oven can cause baked goods not to rise as well.
Flat biscuits can also be due to overworking the dough so that the gluten strands are overdeveloped (which will also make them tough). Or it could cause the dough to be too warm, which makes the butter to weep out of the dough as it bakes rather than create little pockets of steam to help them rise.
Lastly, poor rise can indicate that the leavening agents (in this case it’s the 3 teaspoons baking powder and ¼ teaspoon baking soda) are old. For best results, I recommend using baking powder within 6 months of opening.
The gold standard for measuring flour is to weigh it using a kitchen scale. I’ve provided weights for both all-purpose and gluten-free flour for this recipe to help ensure success. If you don’t have a scale, the next best option is to stir the flour in the container then use a large spoon to scoop the flour into a dry measuring cup (not the one used to measure liquids). Then use a table knife to gently scrape the excess off so that you have a level measure. Of course, for smaller measurements (like the ½ teaspoon salt and 3 teaspoons cinnamon) using measuring spoons is just fine.
You don’t have to, but if you’ve got a box grater, it’s both easy and highly effective. If skipping the grating, I suggest cutting the butter into small pieces (roughly the size of the tip of a pinky finger) then placing the small butter pieces into the fridge to chill for 10 minutes before adding them to the dry ingredients.
Yes. Buttermilk makes these cinnamon raisin biscuits so delicious so if you’ve got it, I suggest using it. Simply replace the milk with buttermilk and omit the vinegar.
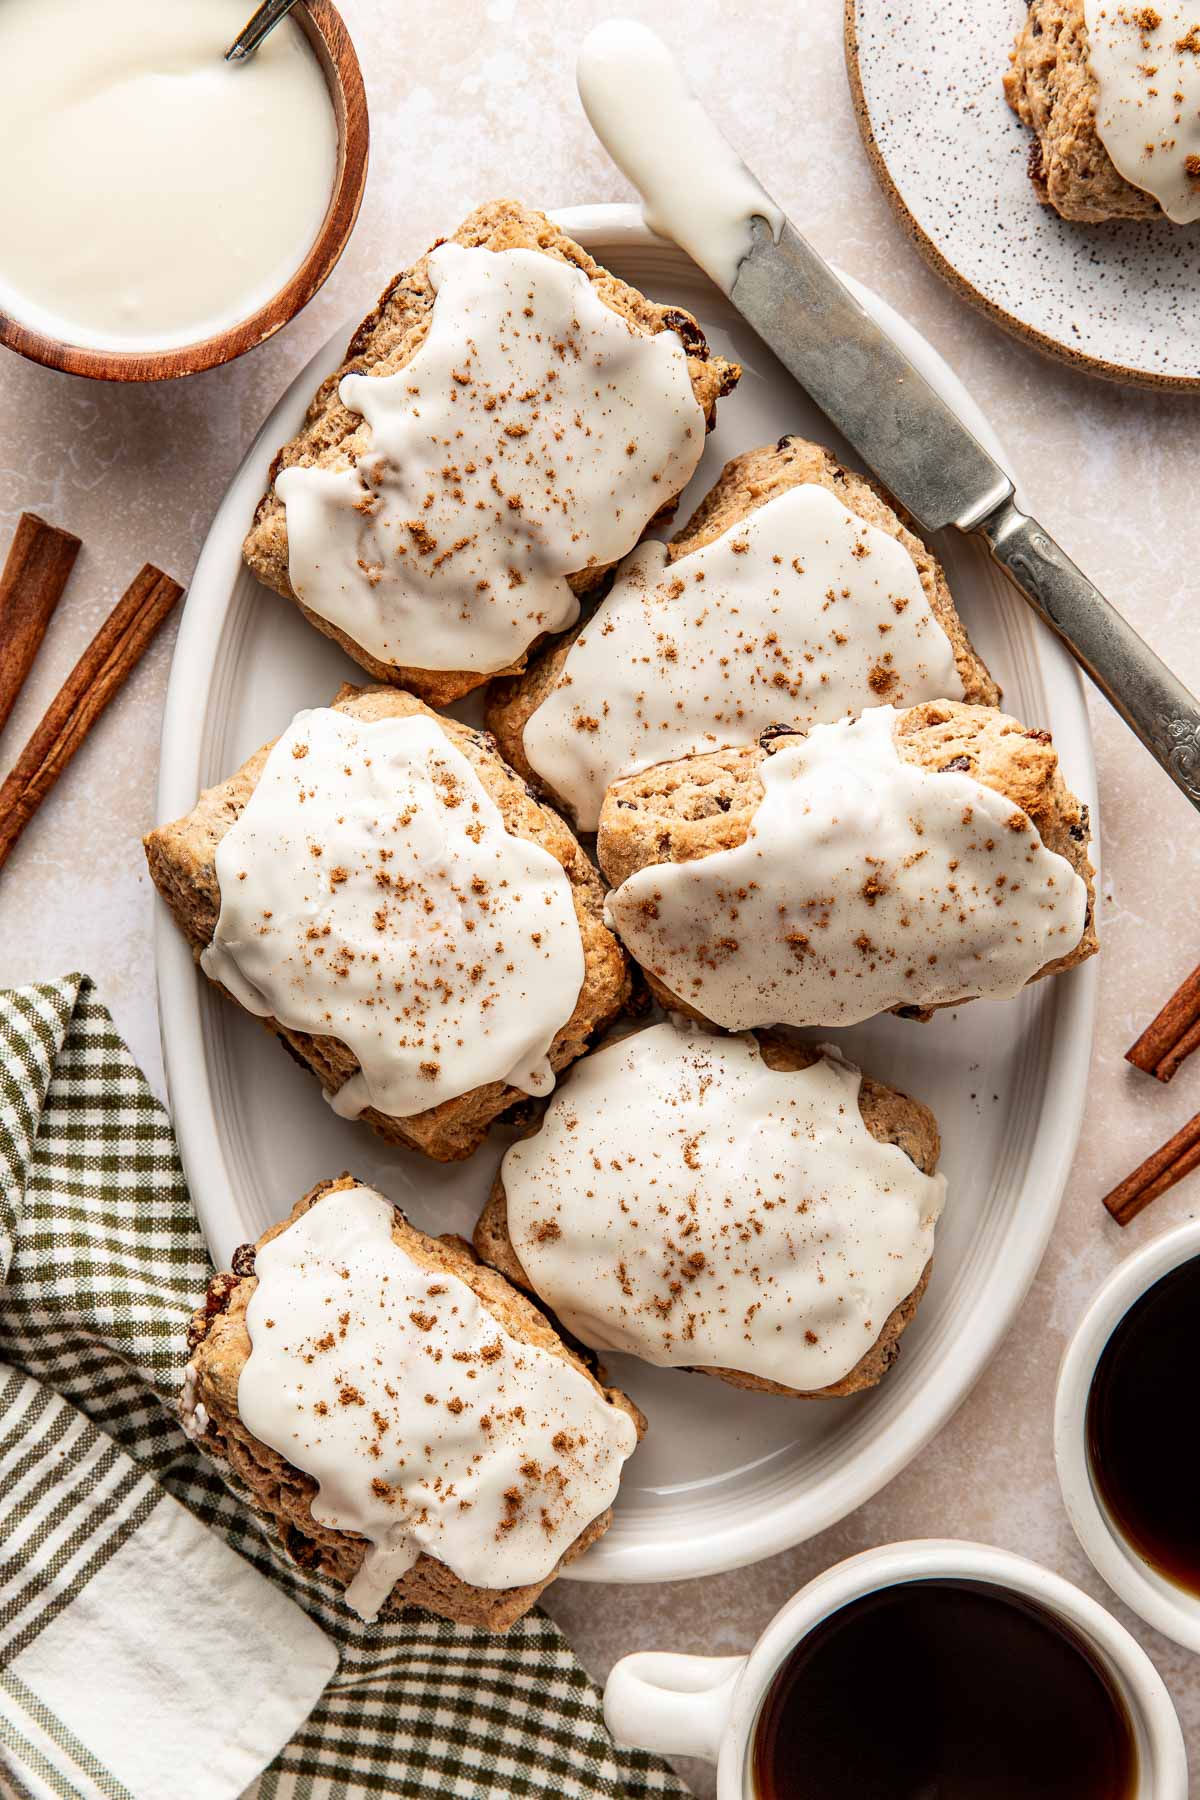
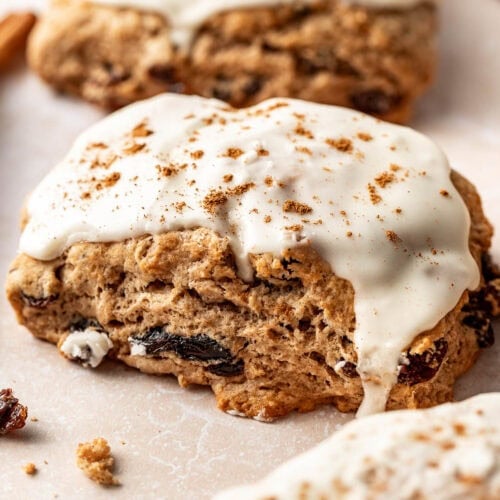
I include a simple powdered sugar glaze recipe, that’s perfect for topping these biscuits and makes them similar to the Hardee’s biscuits I remember. But in lieu of a glaze, they’d also be delicious topped with a brush of melted butter and a sprinkle of a simple cinnamon sugar mixture or a slather of nut butter.
My Top Tips For Baking Biscuits At Home
- Grate (Don’t Cut) The Butter: Grating your butter make the pieces small so you can quickly and easily incorporate them into the flour mixture.
- Spoon (Don’t Scoop) The Flour Into Measuring Cups: Scooping the flour with a measuring cup over packs the cup resulting in too much flour which will make the dough dry and crumbly. Even better than spooning and leveling off the top is to weigh the flour with a kitchen scale.
- Use Cold Ingredients Only: Make sure your butter is straight from the fridge when you grate it. If it’s a hot day or your kitchen is warm, place the butter in the freezer for 10-15 minutes before grating.
- Work Quickly And Use A Light Hand: Use a pastry cutter or pastry blender to cut the butter into the flour. Avoid mix directly with hands, as this will cause the butter to soften and lead to flat, tough biscuits.
- Mind The Baking Time: Start with the minimum baking time and check for doneness when the time is up. The biscuits should be lightly browned on the bottom and not feel wet or sticky. Add more baking time in 1 minute increments. When the biscuits are done, transfer to a wire baking sheet to cool before spooning the glaze over top.
- Don’t Overthink It: Baking should be enjoyable and not stressful. The folds don’t have to be perfect, the edges don’t need to be exactly straight, and it’s okay if the biscuits aren’t exactly square. They’ll still taste delicious!
The Best Way to Store and Reheat Leftover Biscuits
Leftover biscuits can be stored in an airtight container with lid or under a pastry dome for up to 3 days. Reheat for 10-20 seconds in the microwave before enjoying.
Want to save this recipe?
Enter your email below & we’ll send it straight to your inbox. Plus you’ll get great new recipes from us every week!
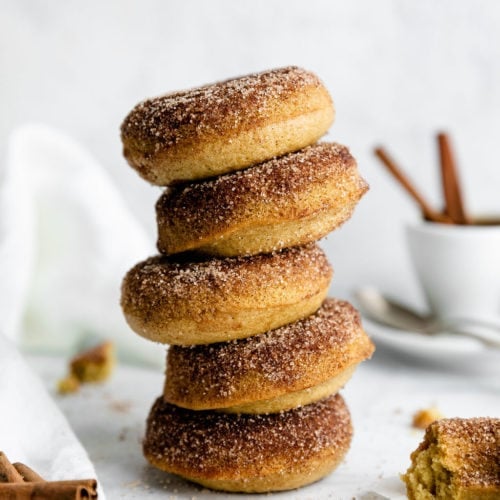
Cinnamon Raisin Biscuits
My first job was making the now retired cinnamon raisin biscuits at Hardee’s. I set out to recreate them using real food ingredients and my time-tested method for no-fuss biscuits. My dad loved those biscuits and he gives these two thumbs up.
Ingredients
For the Biscuits
- 2 cups all-purpose flour (245-250g), plus more for rolling (295g if using gluten-free flour)
- ¼ cup granulated sugar (60g)
- 1 tablespoon baking powder
- 1 tablespoon ground cinnamon
- ½ teaspoon fine salt
- ¼ teaspoon baking soda
- 6 tablespoons unsalted butter, cold
- 1 cup raisins
- ¾ cup + 2 tablespoons whole milk (may substitute ¾ cup buttermilk)*
- 1 teaspoon white vinegar (omit if using buttermilk)
- 1 teaspoon vanilla extract or vanilla bean paste
For the Glaze
- ¾ cup powdered sugar
- 3 tablespoons heavy cream (may substitute half and half or whole milk)
- ½ teaspoon vanilla extract
Instructions
- Preheat the oven to 400℉. Lightly spray a baking sheet with cooking spray or line with parchment paper and set aside.
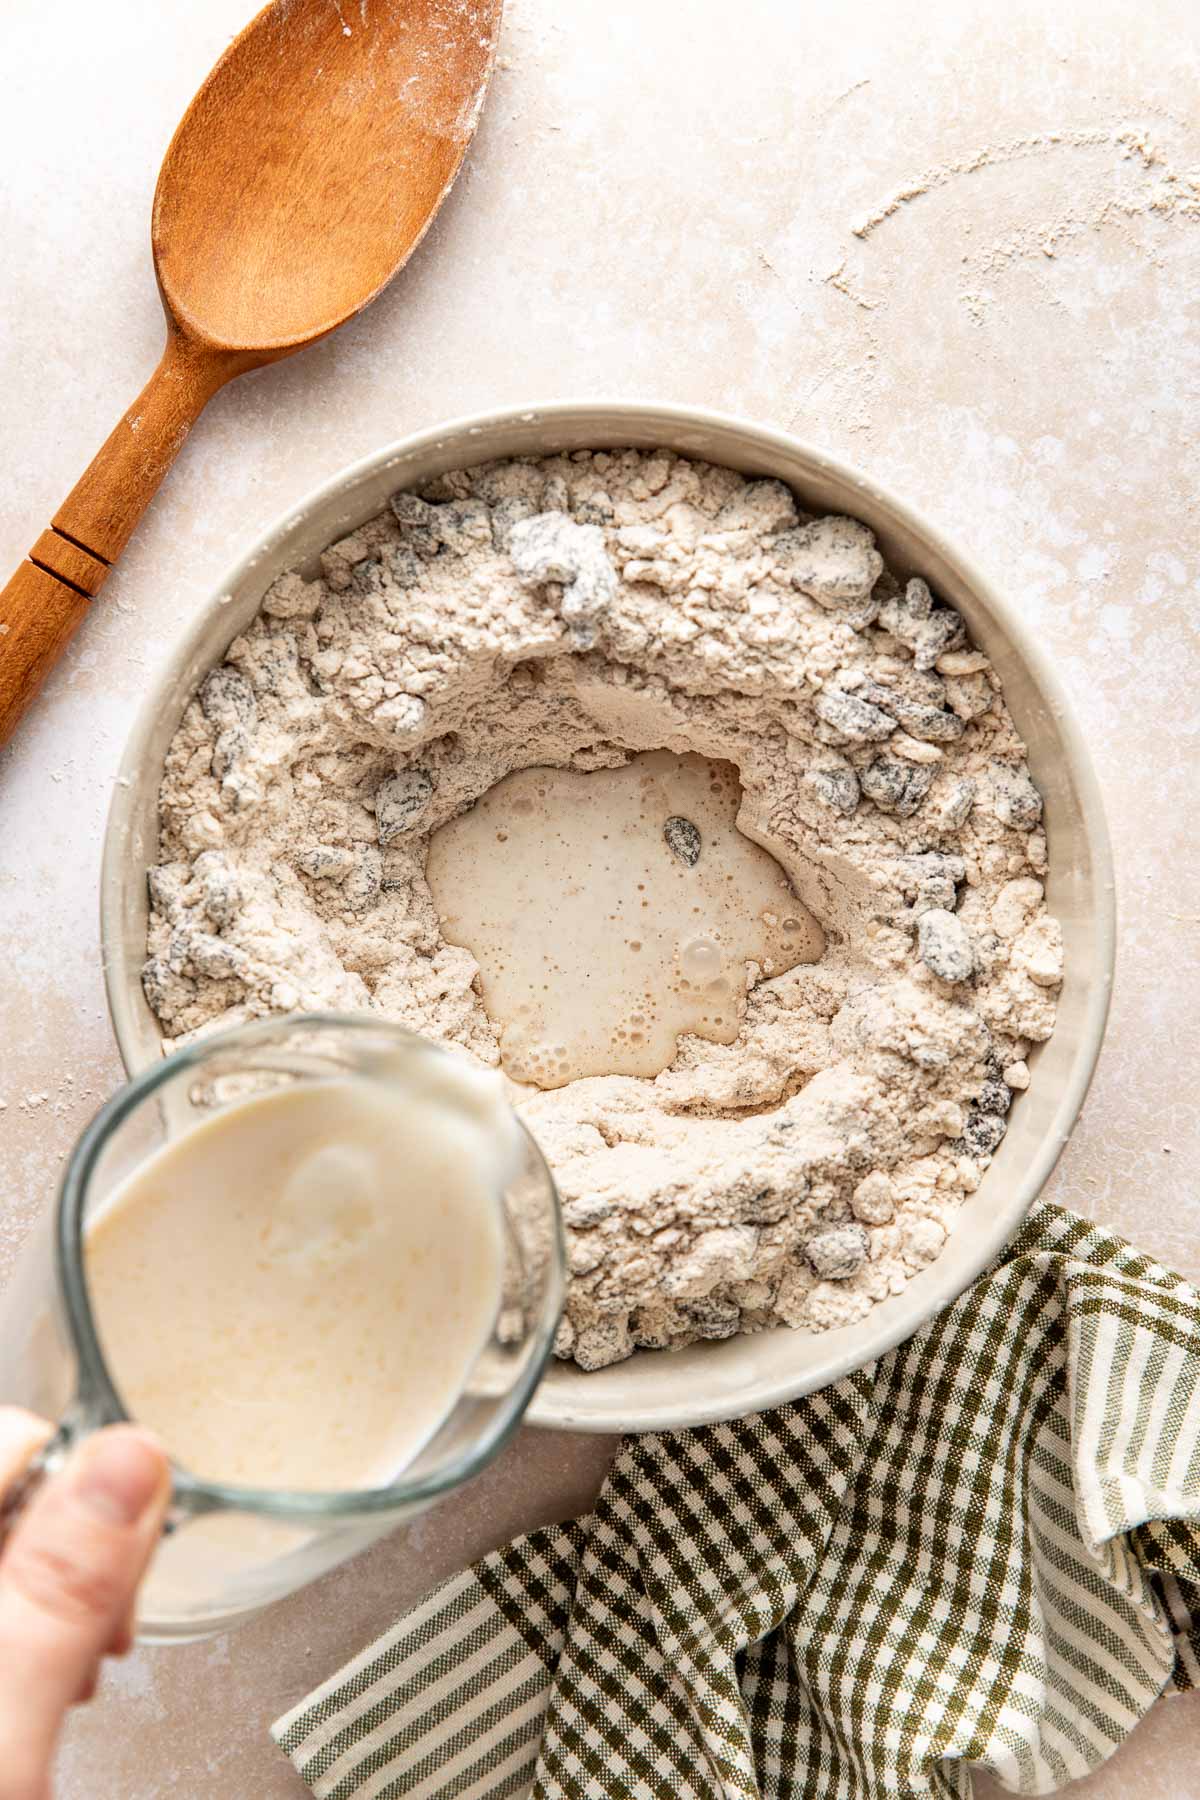
- Add flour, baking powder, sugar, cinnamon, salt, and baking soda to a medium bowl and whisk together to combine.
- Using a box grater, grate the cold butter into the flour mixture.
- Use a fork or pastry blender to work the grated butter into the flour mixture until it resembles coarse crumbs. Avoid using your hands as this causes the butter to melt and will not give you the fluffiest biscuits.
- Stir the raisins into the flour mixture.
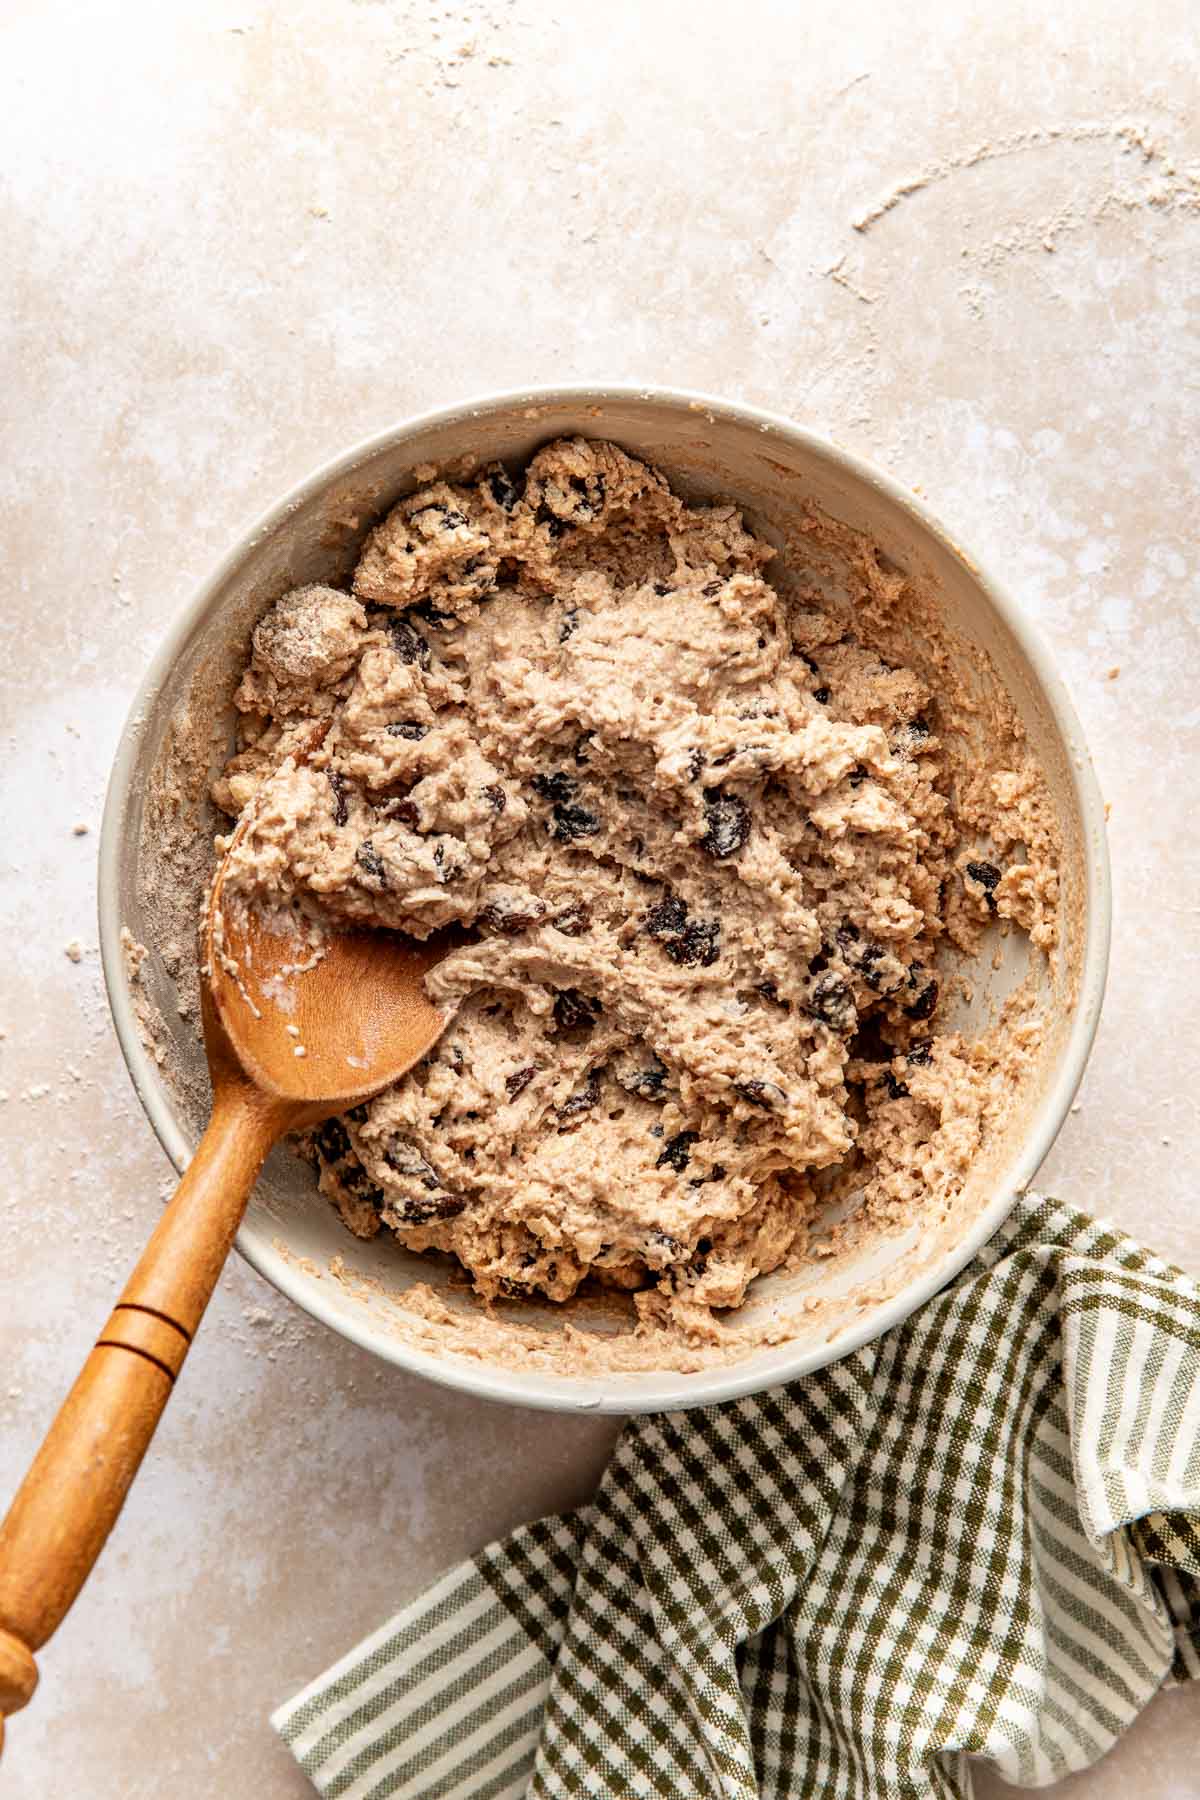
- Make a well in the center of the flour mixture. Pour the milk, vinegar, and vanilla into the well and stir until a soft, craggy dough forms. Almost all of the flour will be incorporated into the dough but some may remain on the edges or bottom of the bowl.
- Turn the dough and any loose bits of flour out onto a lightly floured surface. If the dough is very sticky, lightly dust the surface with flour.
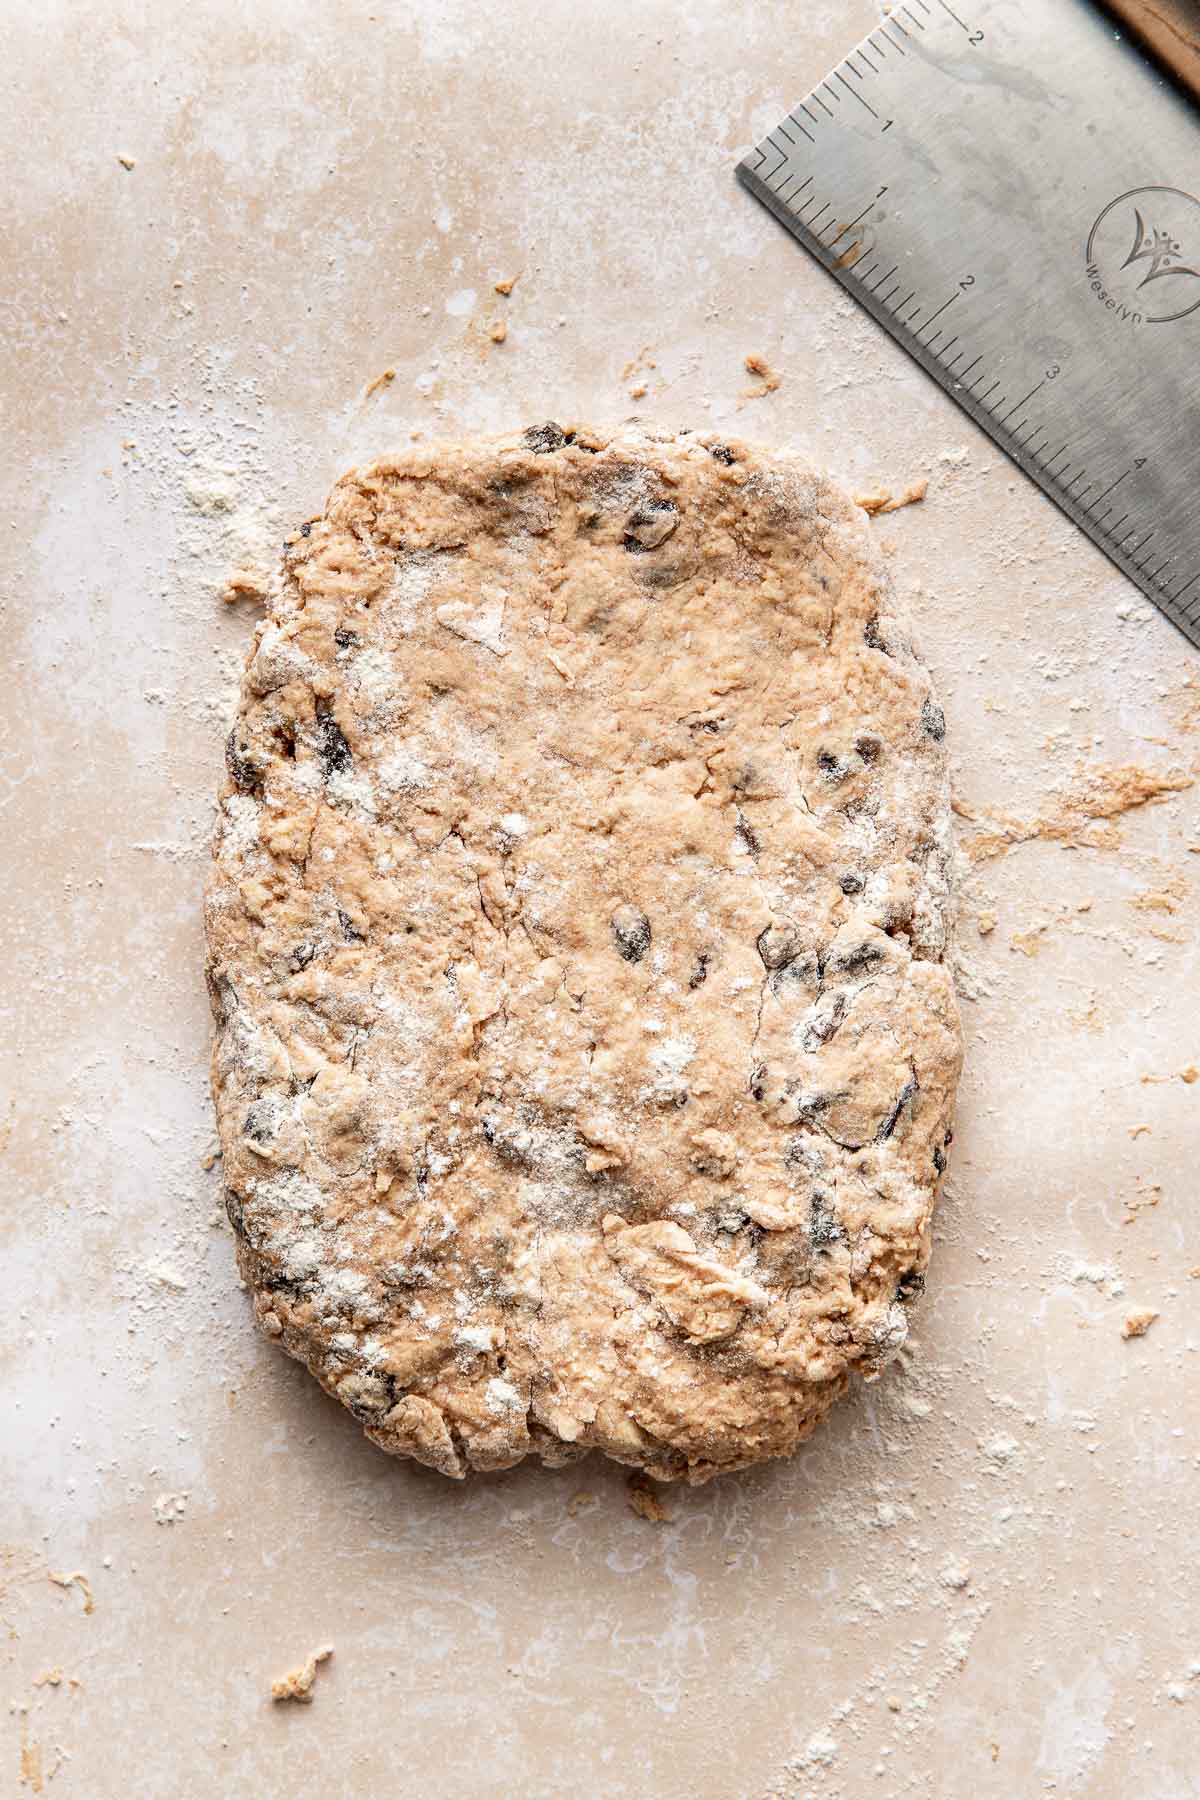
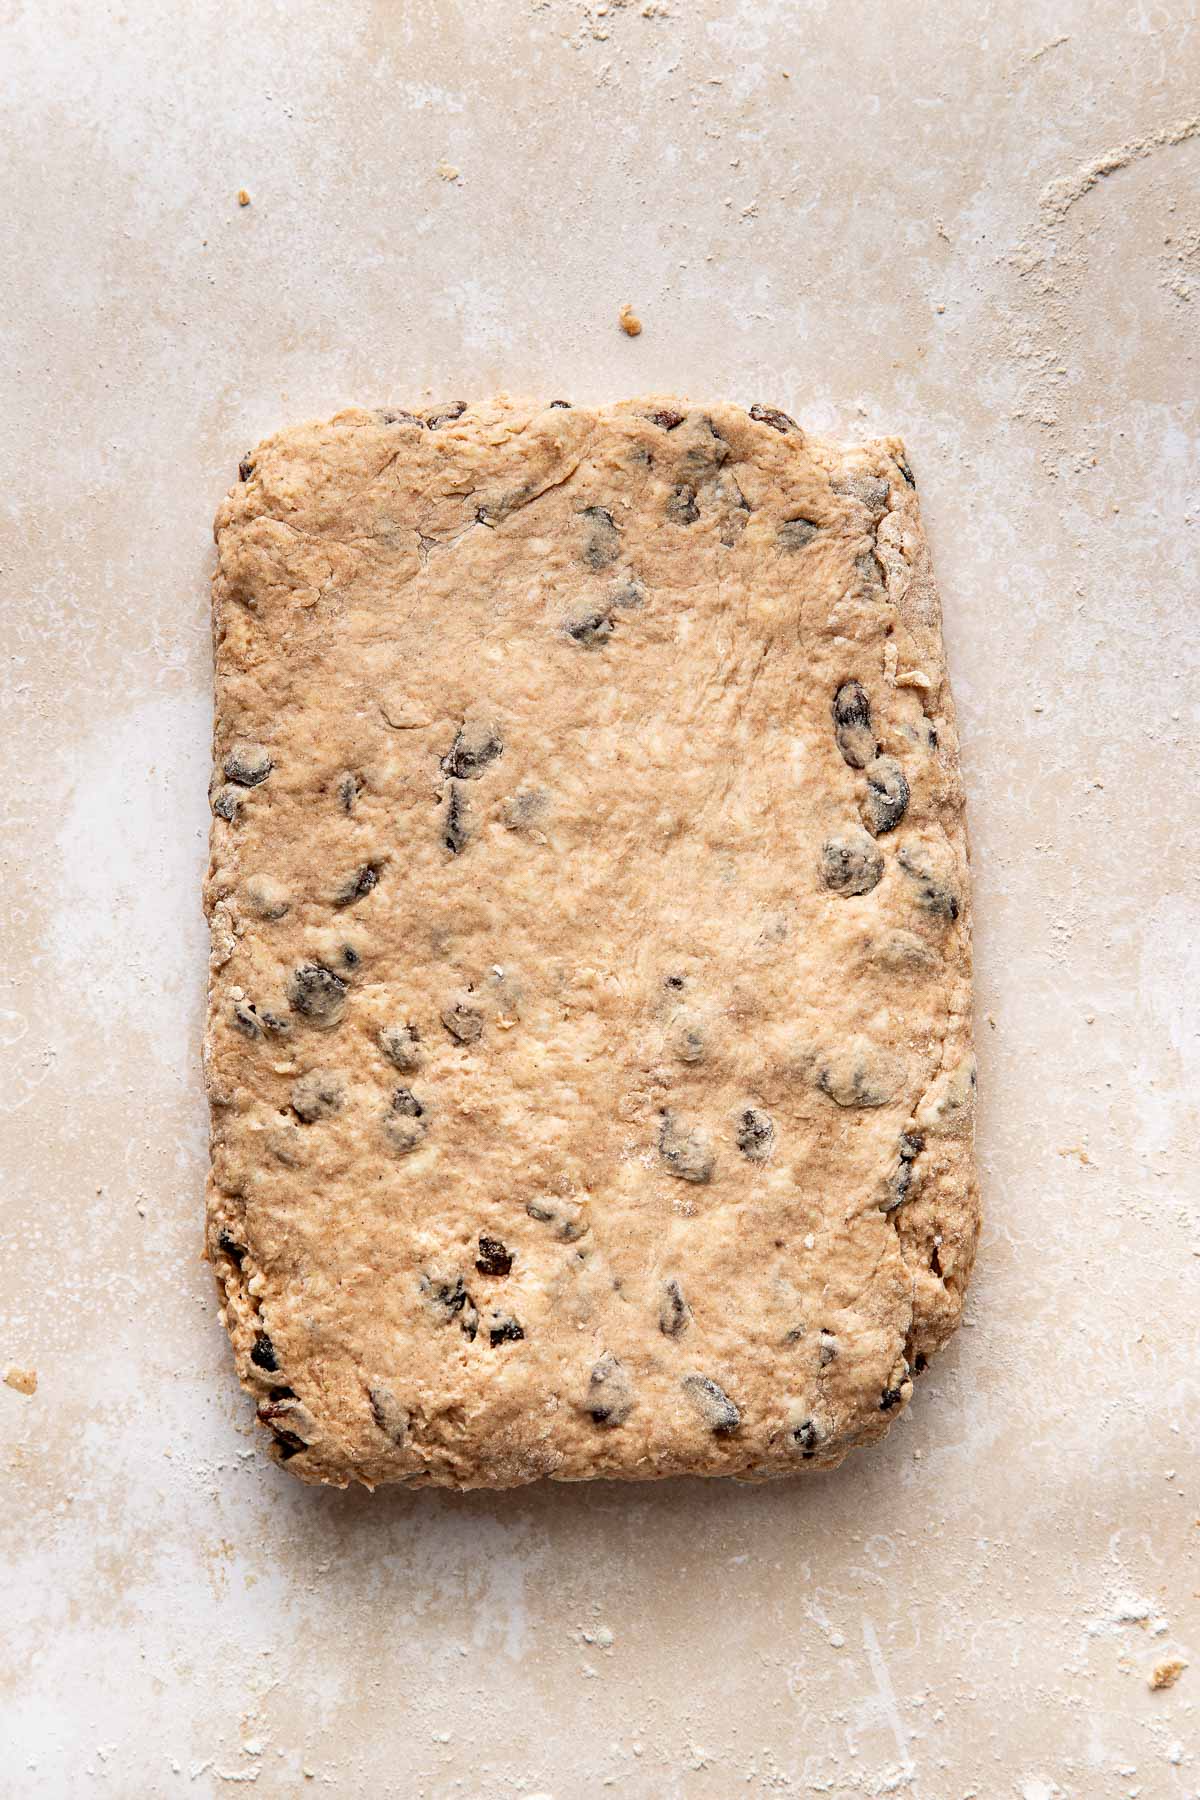
- Use your hands to pat the dough into a rectangle 1-inch thick.
- Working quickly, fold the rectangle of dough in half and then press it into a rectangle again.
- Repeat this fold and press process 3 more times (for a total of 4 folds). By now all of the flour should be incorporated into the dough.
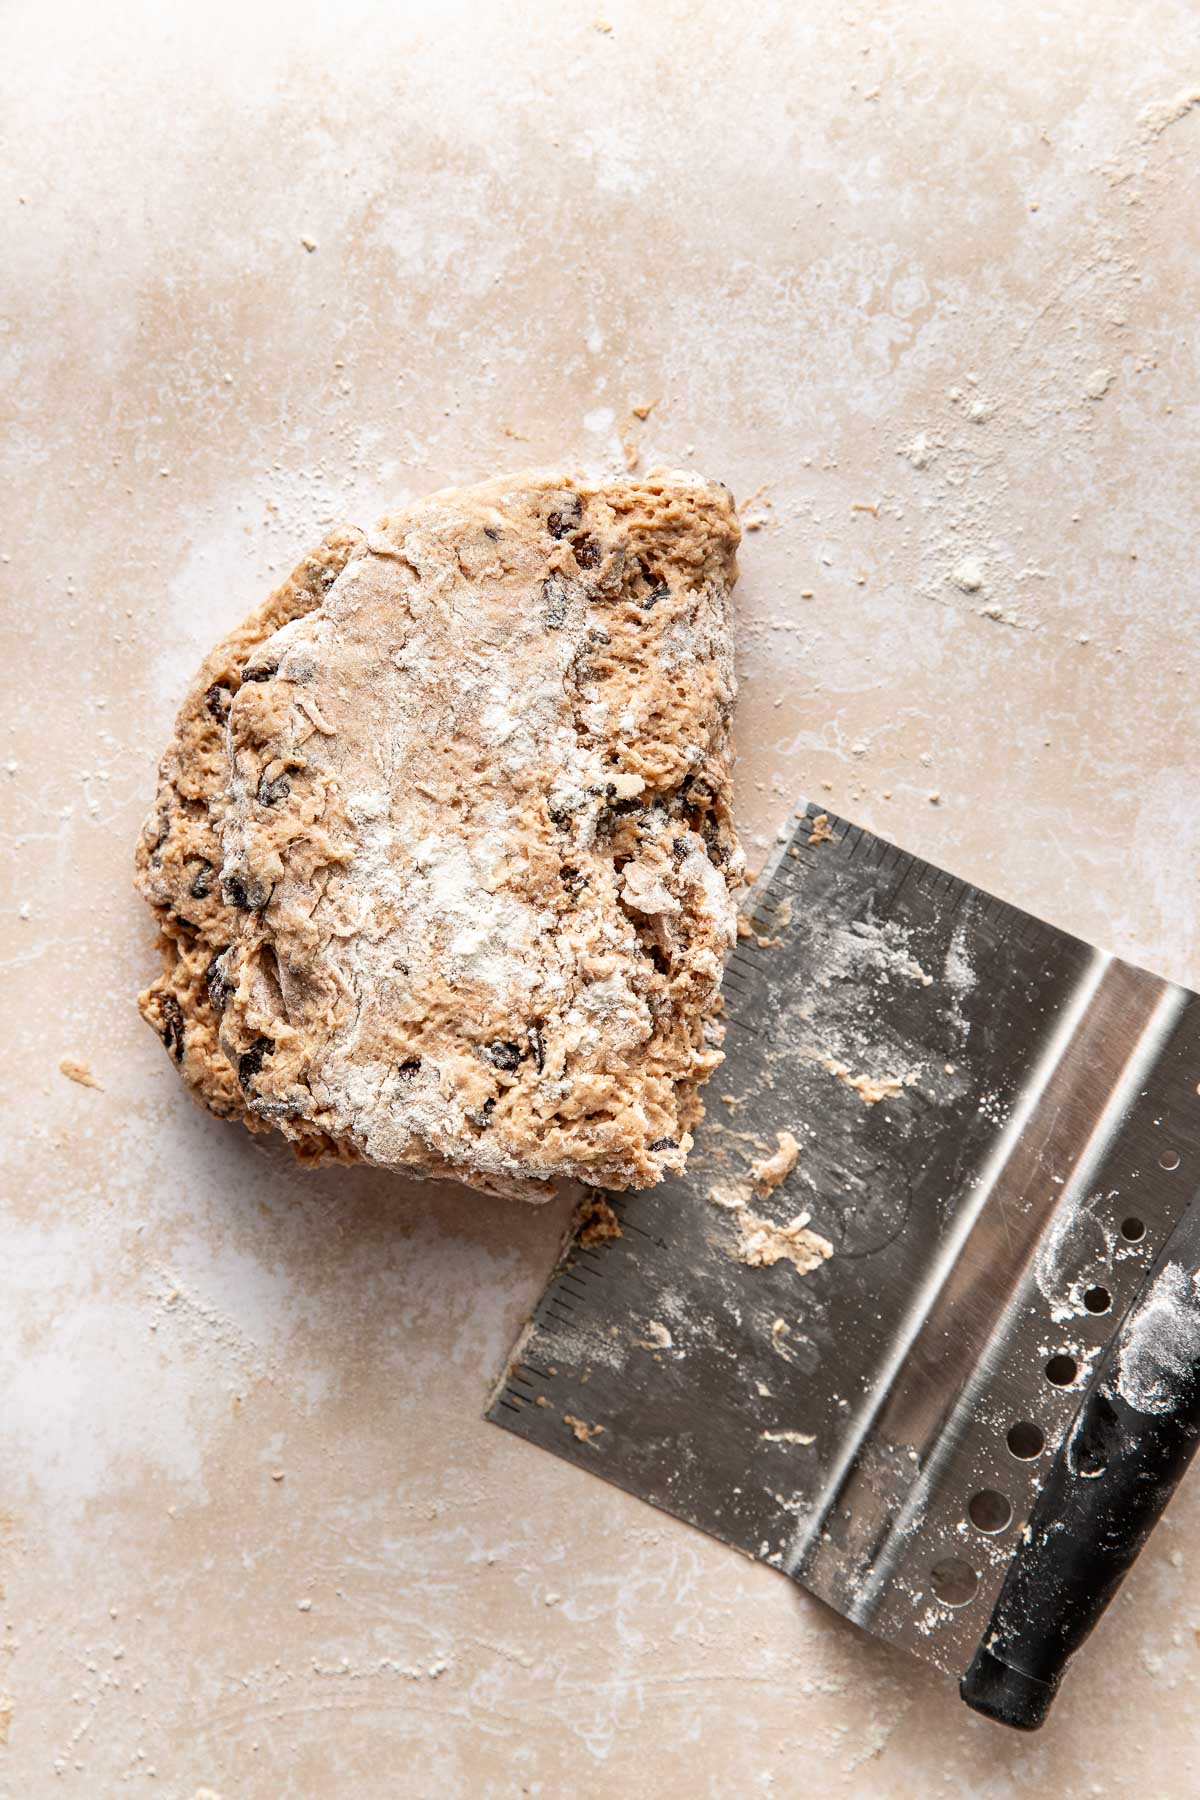
- Without performing another fold, shape the dough into a rectangle ¾-inch thick (about 6 x 8 inches). Use your hands or a bench scraper to help make the edges tidy.
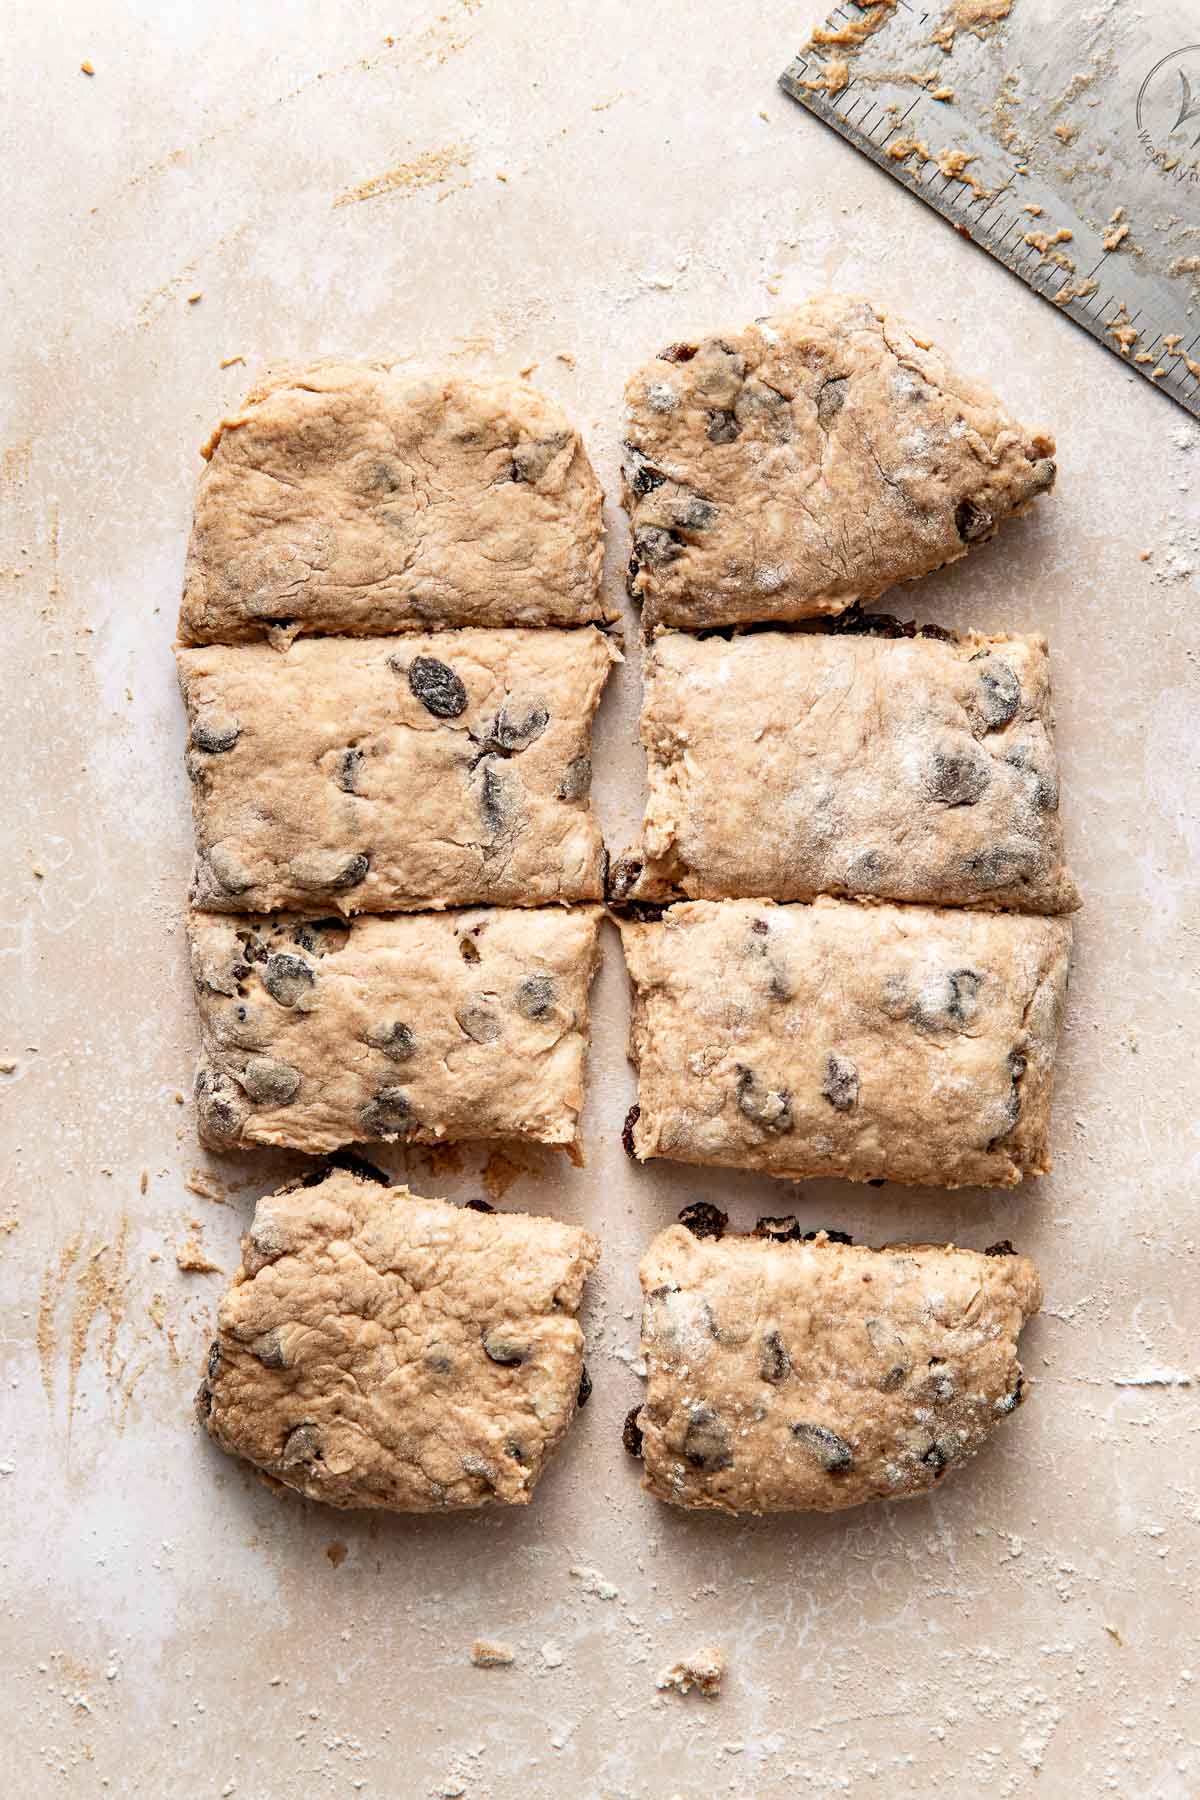
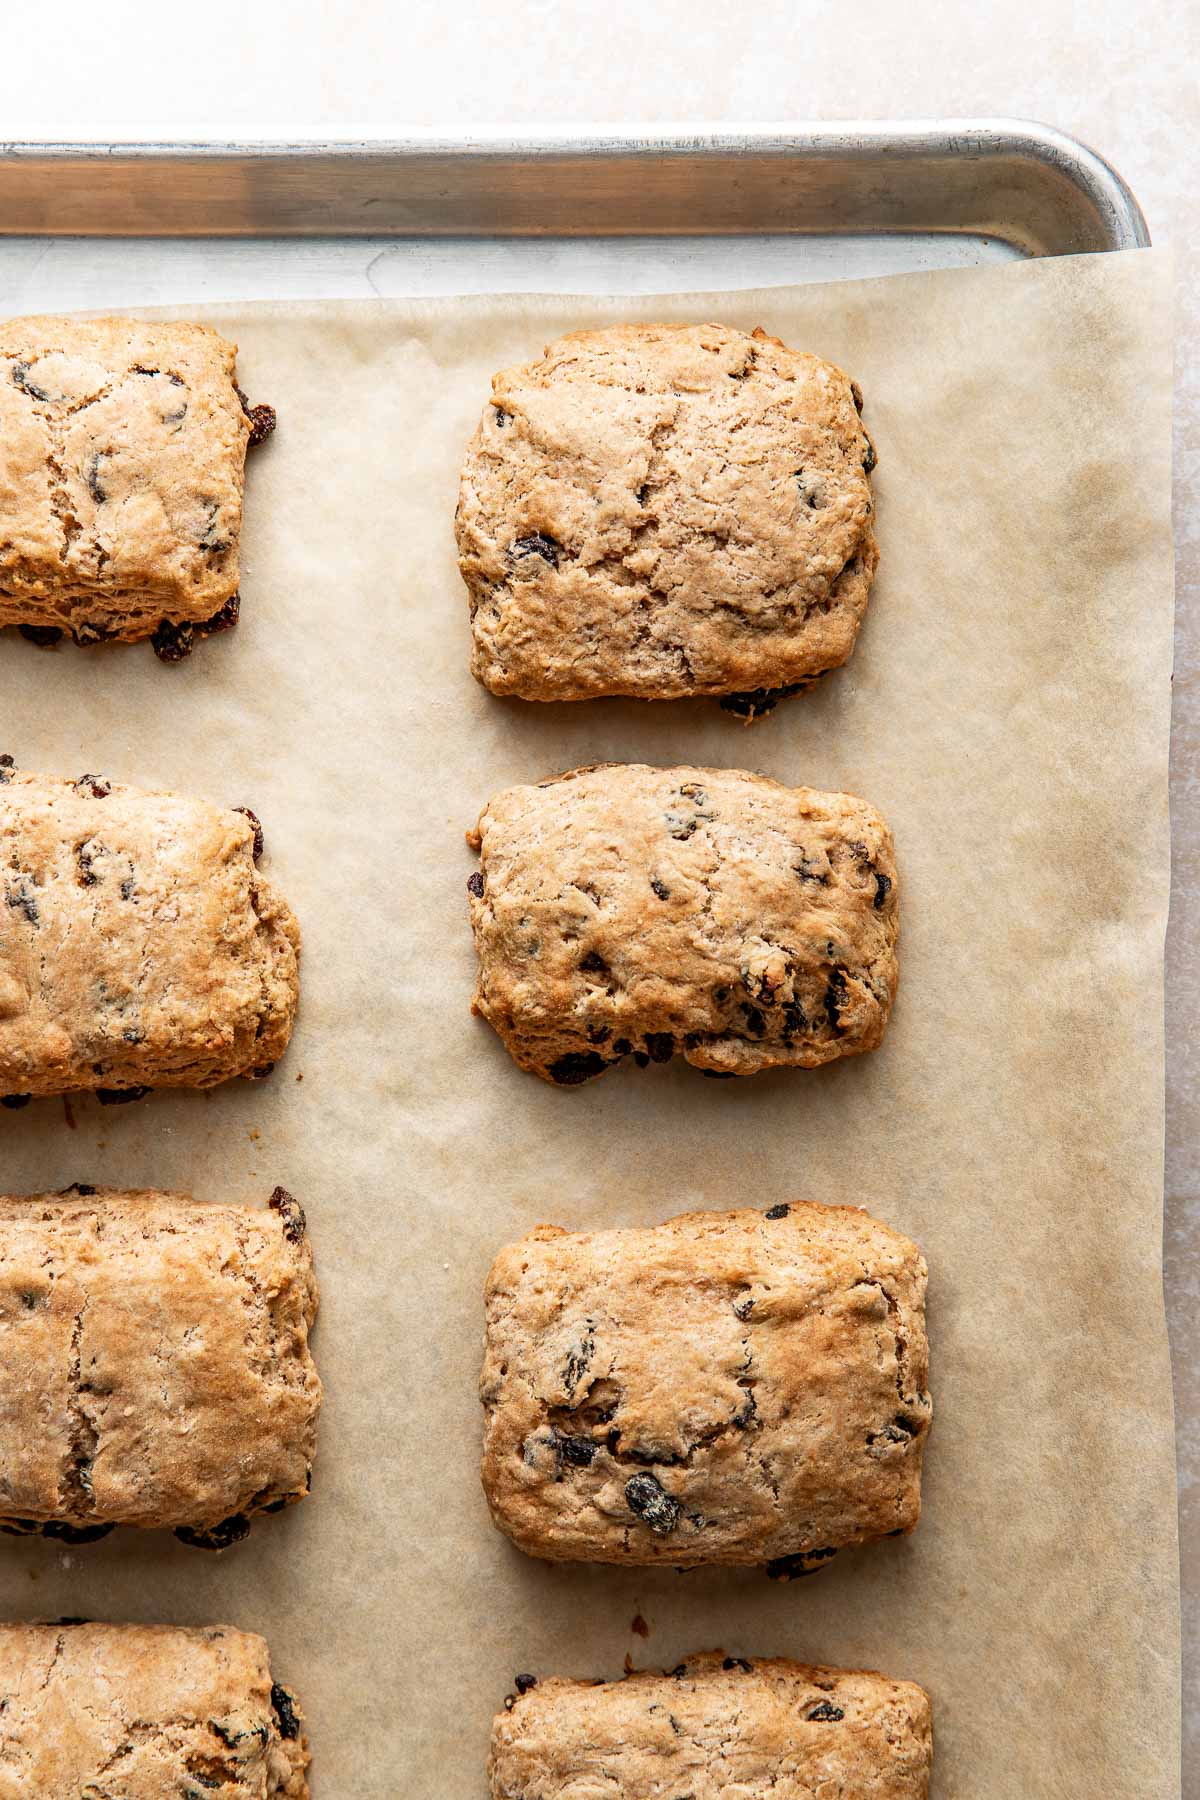
- Use a bench scraper or sharp knife to cut the dough into 8 squares making one cut length wise then 3 cuts width-wise.
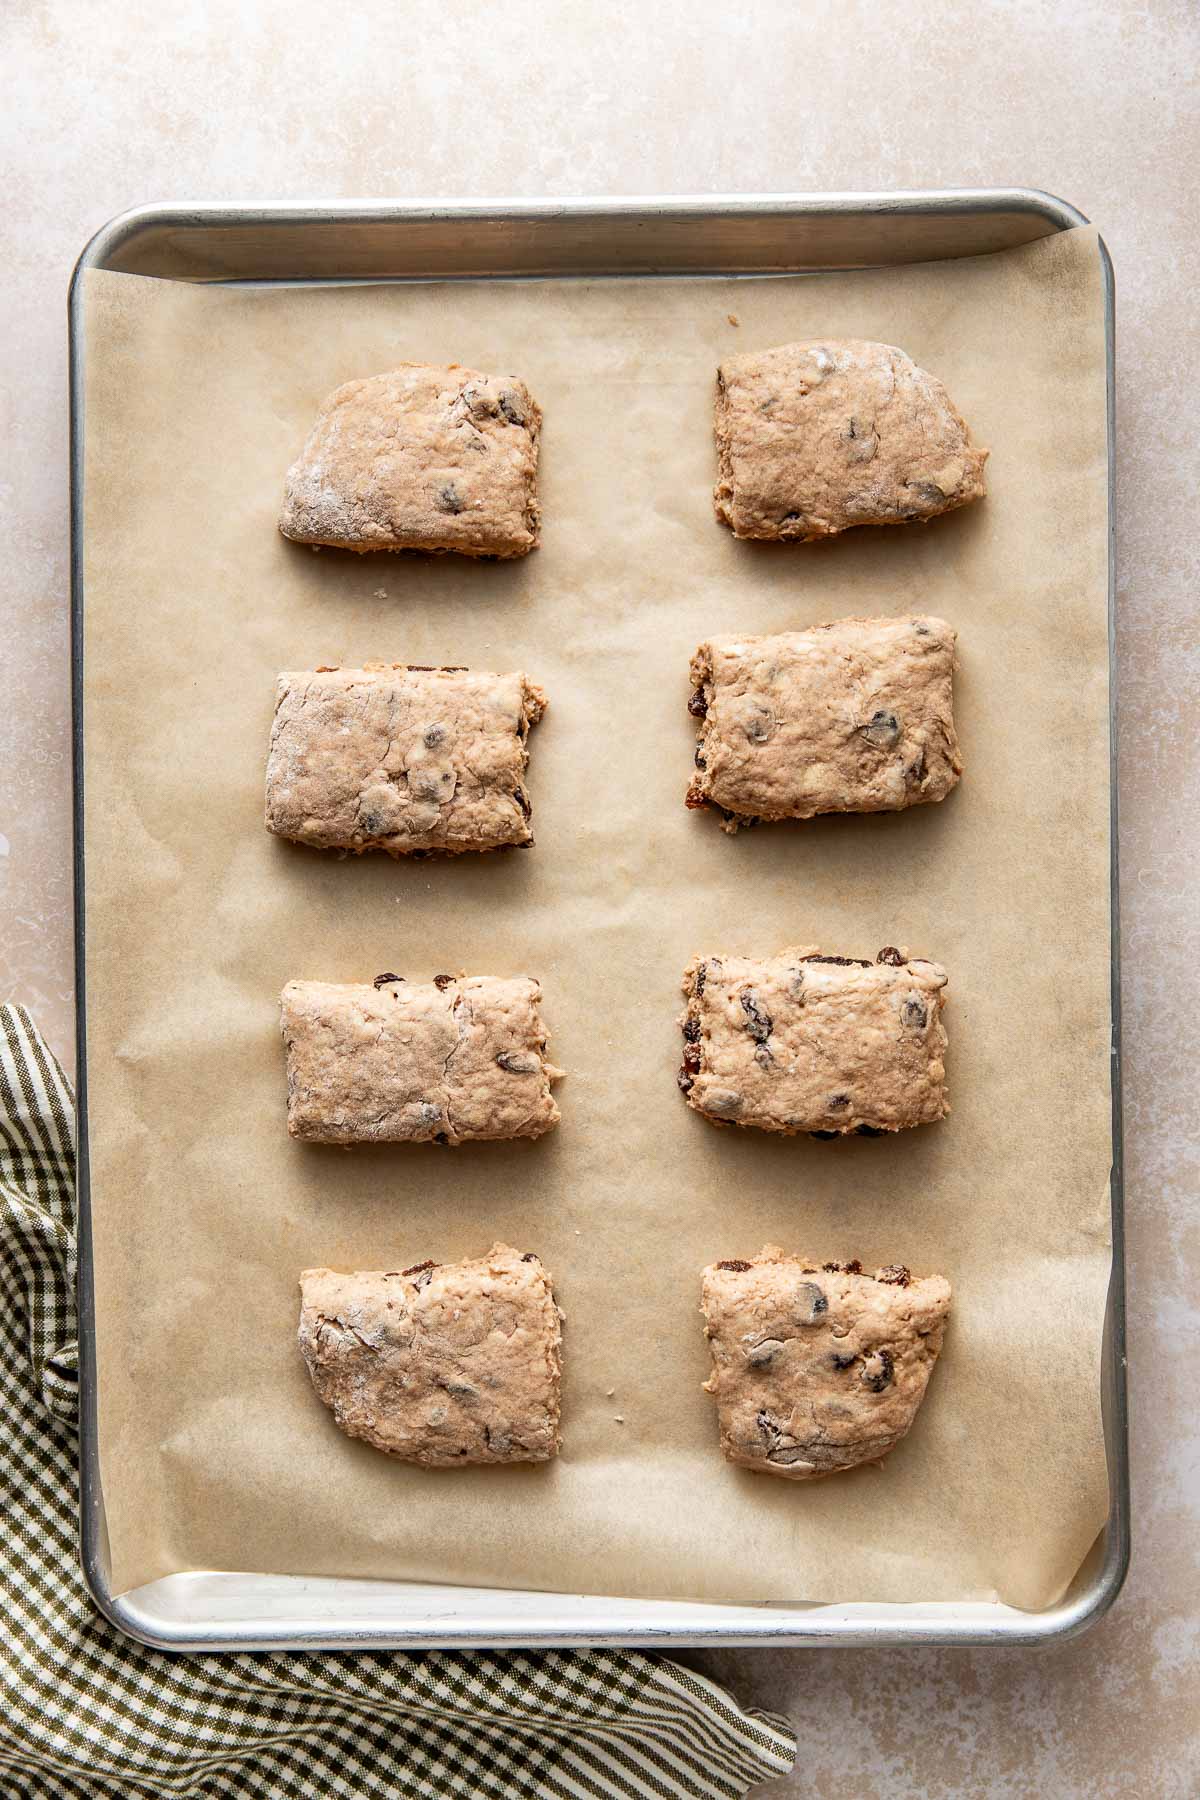
- Arrange the biscuits on the baking sheet about 1 inch apart.
- Bake for 13-15 minutes or until the tops and bottoms are a very light golden brown.
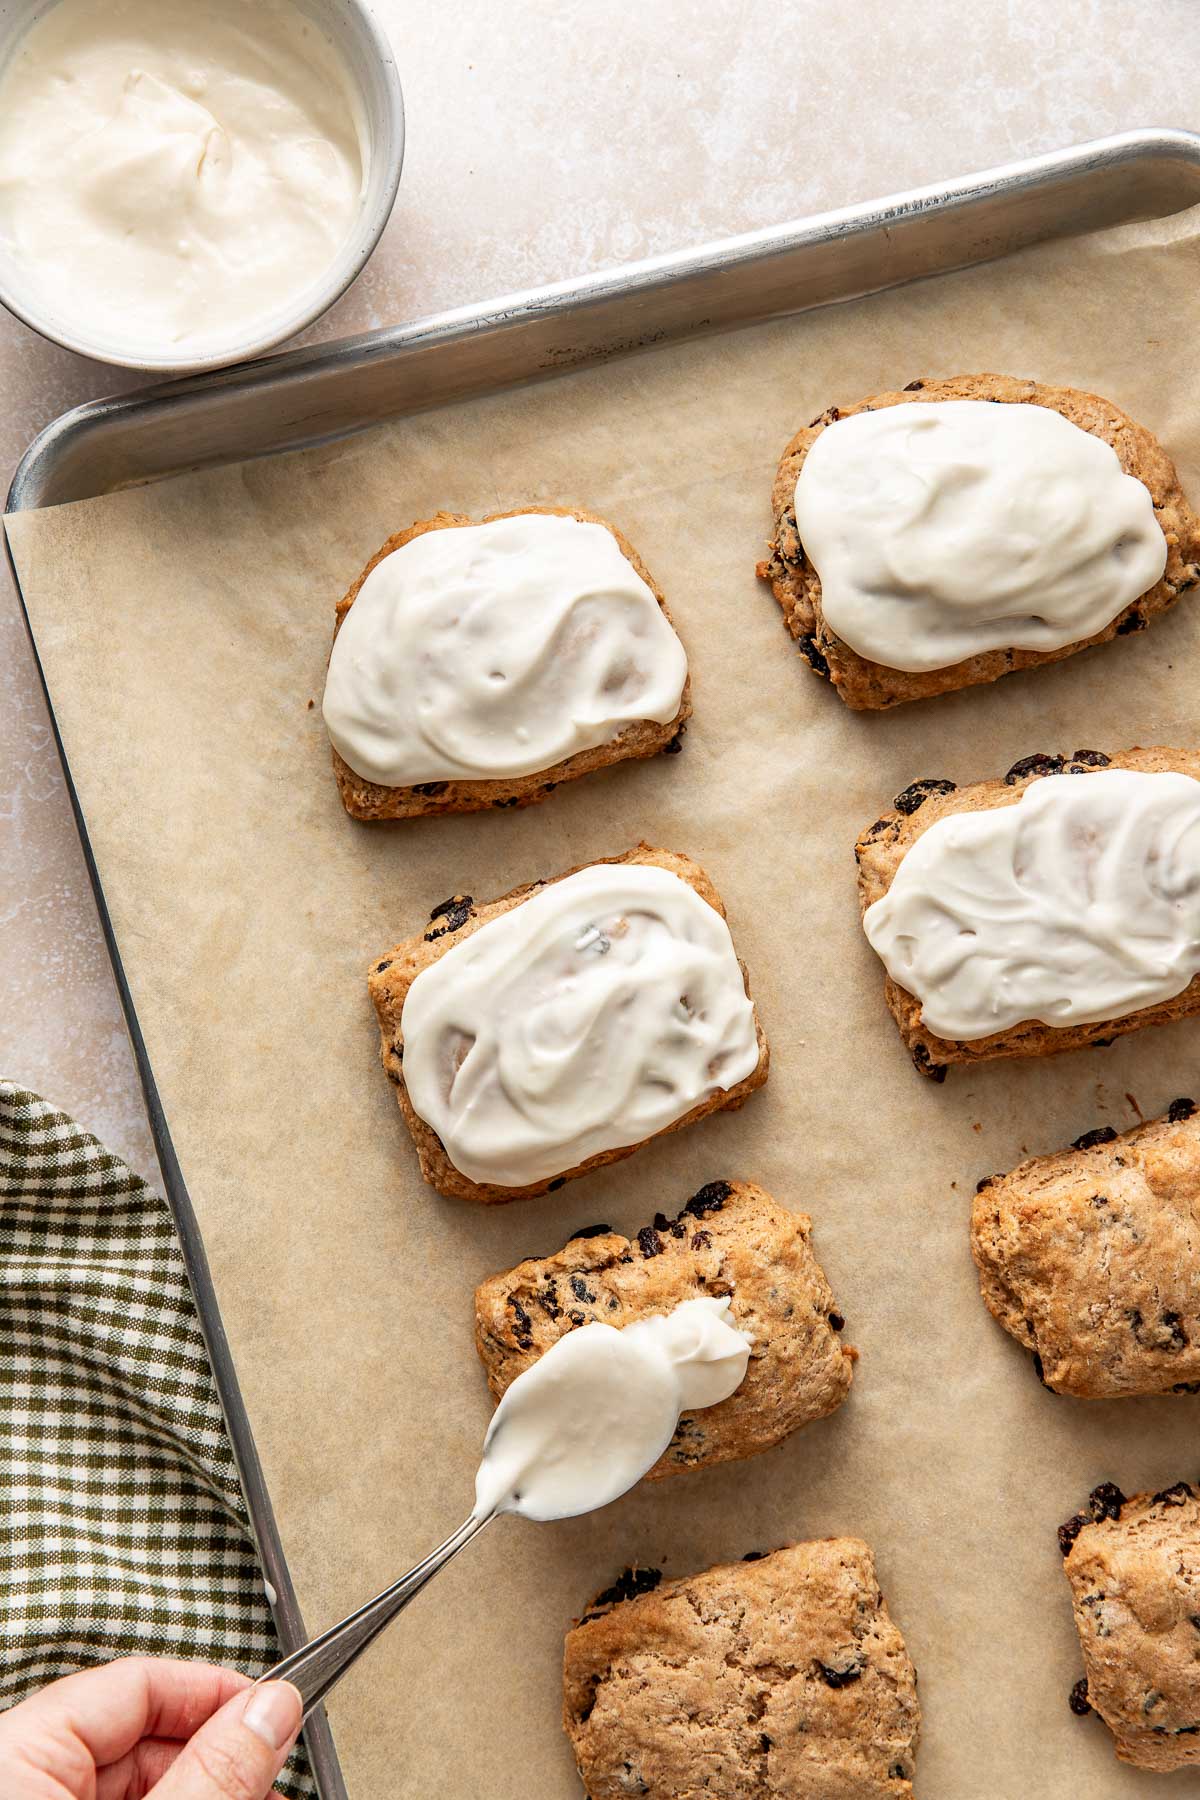
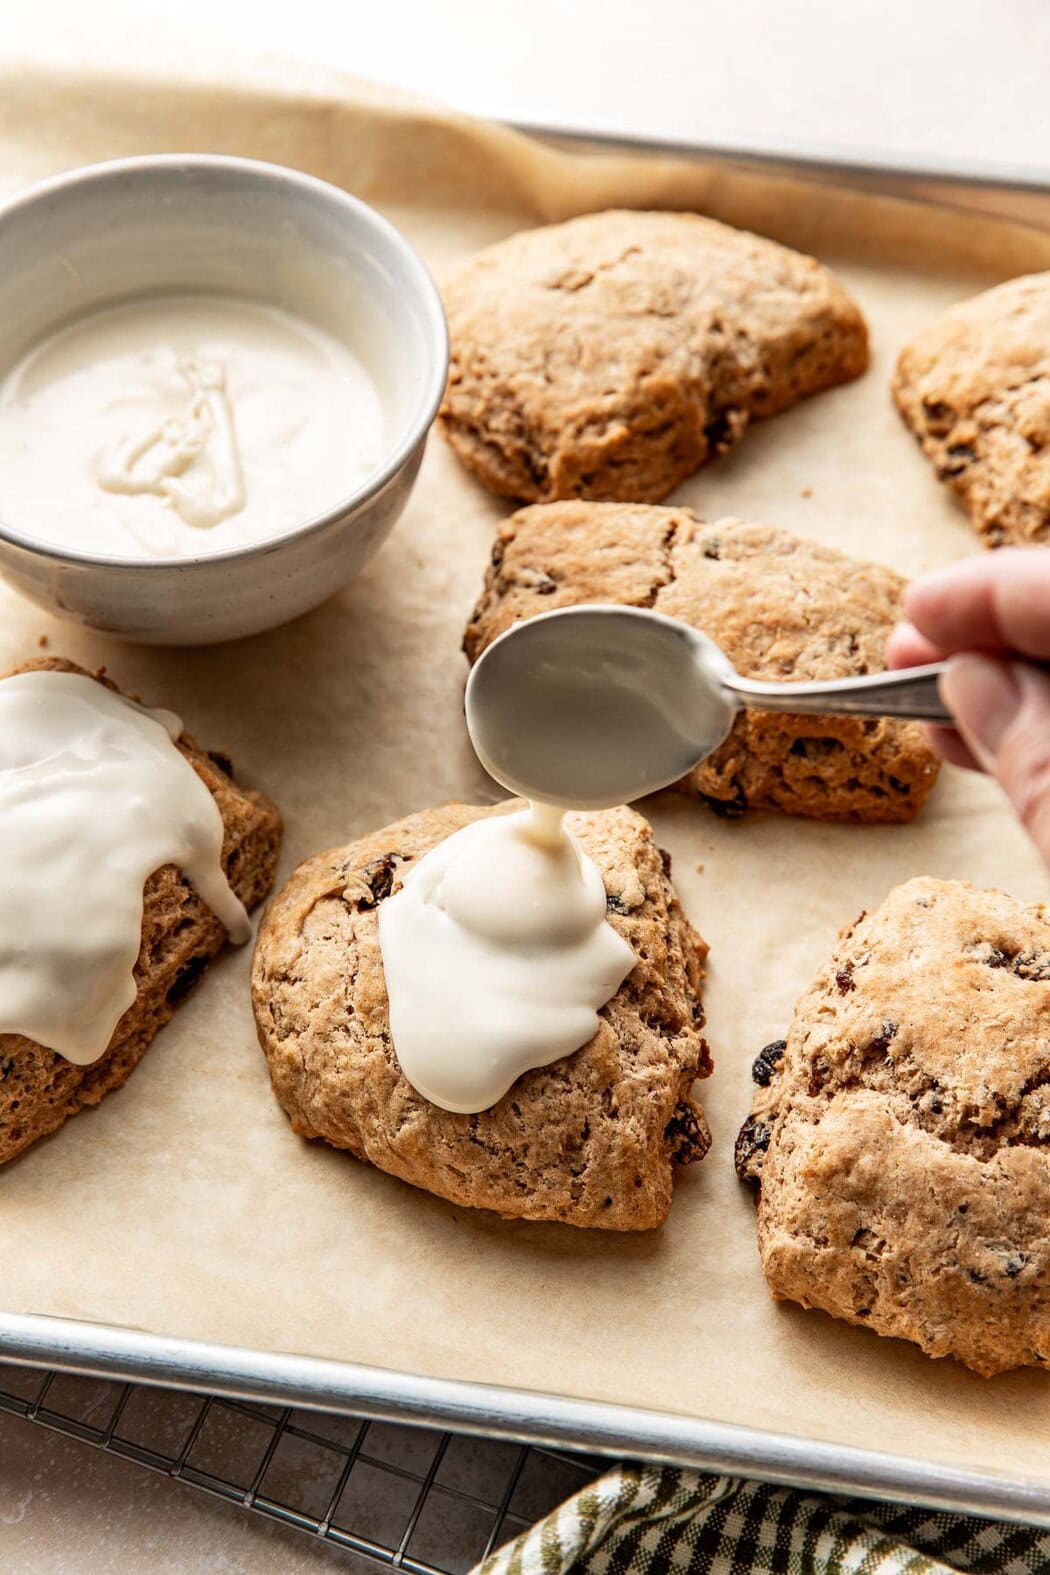
- Remove the biscuits from the oven and allow them to cool while you make the glaze.
- To make the vanilla glaze, combine the powdered sugar, heavy cream, and vanilla in a small bowl and mix until smooth.
- Spoon the glaze over the warm biscuits and serve. Store any leftover biscuits in an airtight container on the counter for up to 3 days. Reheat for 10-20 seconds in the microwave before enjoying.
Last Step! Please leave a review and rating letting us know how you liked this recipe! This helps our business thrive so we can continue providing free recipes and high-quality content for you.
Notes
*We do not recommend substituting dairy-free milk or butter in this recipe.
Nutrition Information
- Serving Size: 1 biscuit
- Calories: 320
- Fat: 10 g
- (Sat Fat: 6 g)
- Sodium: 415 mg
- Carbohydrate: 50 g
- (Fiber: 3 g
- Sugar: 19 g)
- Protein: 5 g
- Cholesterol: 35 mg
Dietary
The photos in this post were taken by Megan McKeehan.
For ultimate success, we highly recommend reading the tips in the full blog post above. All photos and content are copyright protected. Please do not use our photos without prior written permission. If you wish to republish a recipe, please rewrite the recipe in your own unique words. Link back to the source recipe here on The Real Food Dietitians. Thank you!
Ohhhhhh I’m excited to see this! I love those biscuits and can hardly wait to make them!
Yay! We’re excited that YOU’RE excited 🙂 Let us know what you think when you make them, Shanon!
These transported me to the late 90s. A couple of things:
1. I can’t believe the there is so little sugar in these. I made them without the icing and they are sufficiently sweet.
2. I used European butter because it was all I had. I’m sure it added to the calorie count, but it was delicious!
3. I forgot to add the raisins at the appointed time, adding them later, but it was fine.
4. I turned the dough a quarter turn in between foldings because it was easier to maintain the rectangular shape.
I will definitely make these again. You ARE the Biscuit Queen!
Oh, Cyndee! You absolutely made my day with this comment. I’m so glad you enjoyed these biscuits and that they could transport you back in a time even for a few moments.
delicious!
Thanks so much, Ruth!
I have your best biscuit recipe saved as my utter fav. They are quick to make and delish! So when I saw this recipe for raisin biscuits, I thought I had nothing to lose in trying them out! And I was not disappointed! It was just as quick and easy to make and bake. :0)
The flavor of the raisins carries through each biscuit. I love it because the biscuits alone (without glaze) have the perfect sweetness….wonderful for breakfast. I was planning to make the glaze, but then found out that I did not have enough powdered sugar. So my husband suggested I make a honey butter spread instead. And it worked beautifully. I split one biscuit and spread it in the middle…YUMMO! I strongly suggest you try it in place of the glaze as an alternative! I will try the glaze the next time I make these, though. :0)
Thank you for the recipe. I will be exploring your website for other wonderful delectables. :0)
Thanks for the feedback and 5-star rating, Delia!
Are these the same instructions you would recommend for high altitude baking? I saw you are in Boulder, and I’m in Evergreen 🙂
Hi Paige – Yes, this is the exact recipe I use here in Boulder. Since you’re only about 1500 feet higher than I am you should not need to make any adjustments to the recipe.