I used to avoid cutting squash (butternut squash in particular) simply because it seemed difficult to do. The squash is heavy, the skin is tough, and it felt like superhero strength was required just to get through it.
Luckily, over time, I figured out a method that makes the process quick, safe, and surprisingly simple, even for the most beginner home cook. Now, cubing butternut squash feels second nature, and I actually look forward to making butternut squash recipes of any kind. Whether diced for roasting, tossed into a skillet on the stove, added to a warm soup, or blended into a creamy pot of mac and cheese, my step-by-step guide for how to cut butternut squash into cubes shares the easiest way to tackle the task.

What To Gather
- Butternut squash
- Two medium bowls – one for the seeds and one for the cubed pieces
- Cutting board
- Sharp knife – I recommend an 8-inch or similar size chef’s knife
- Large spoon – for scooping out the seeds
Step 1: Stem And Peel The Squash
I begin by slicing about ¼ inch off the top stem end of the squash and the base end of the squash. I use a sharp paring knife, vegetable peeler (I like this y-peeler), or swivel peeler to remove the skin from neck to base.

Step 2: Cut Squash In Half
Next, I slice the entire squash in half lengthwise from neck to base, exposing the seeds.
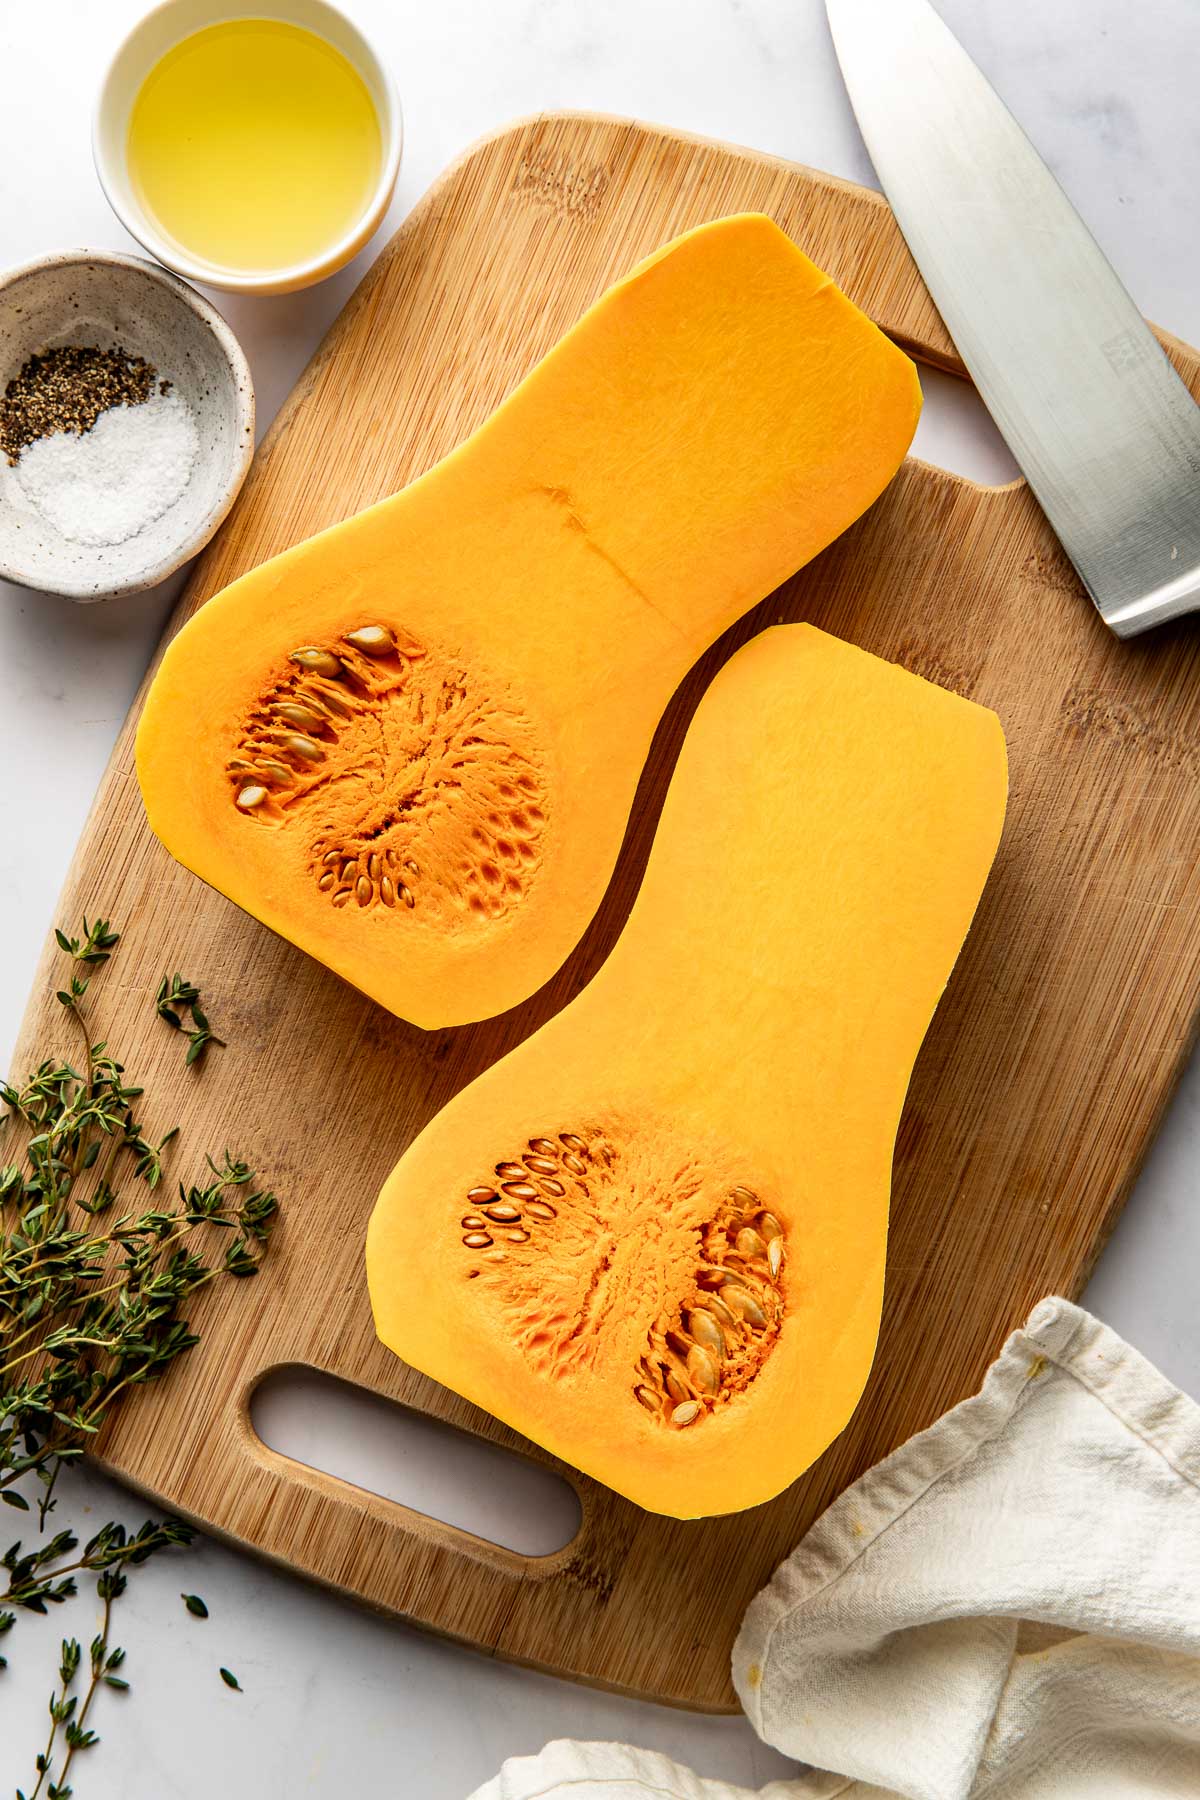
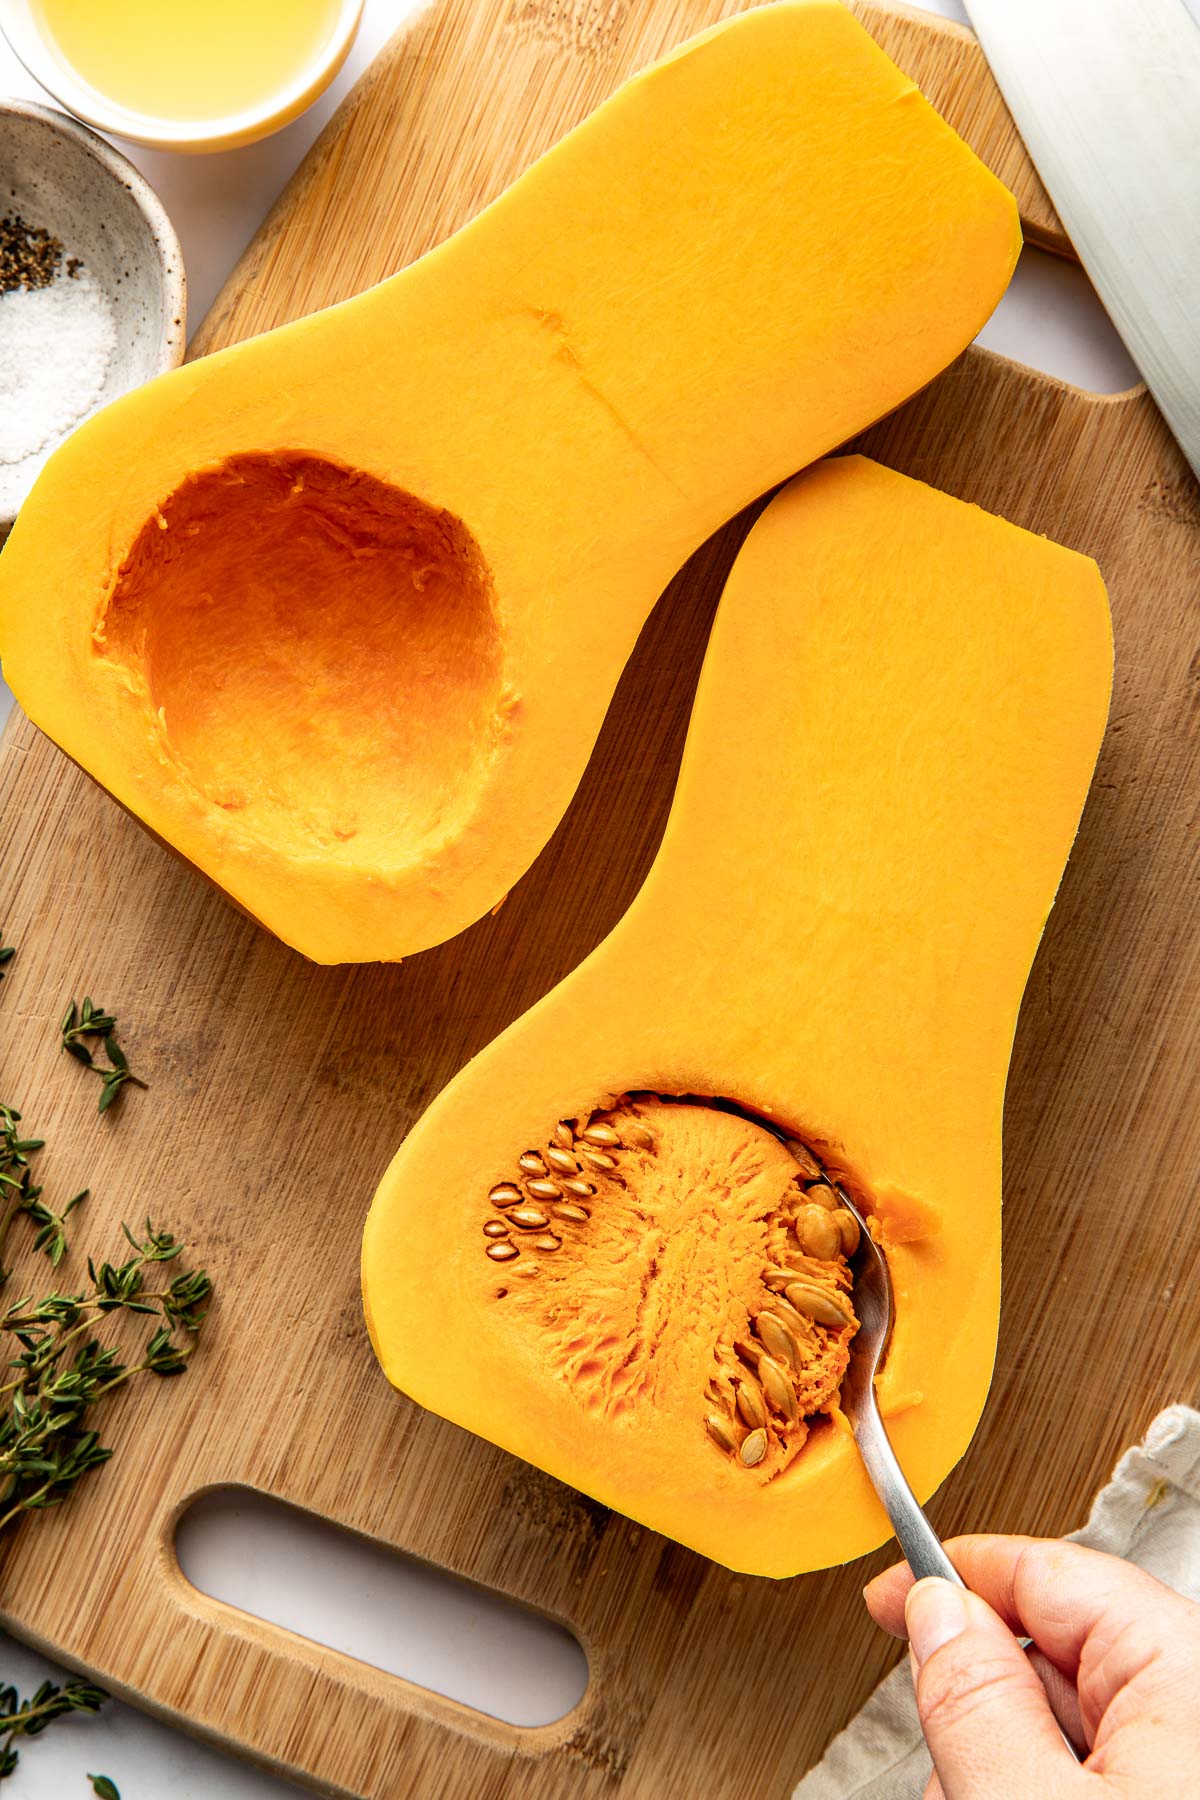
Step 3: Scoop Out The Seeds And Pulp
Using a spoon, I scoop out the seeds and pulp, similar to carving a pumpkin, and transfer them to a bowl.
Step 4: Slice And Cube The Squash
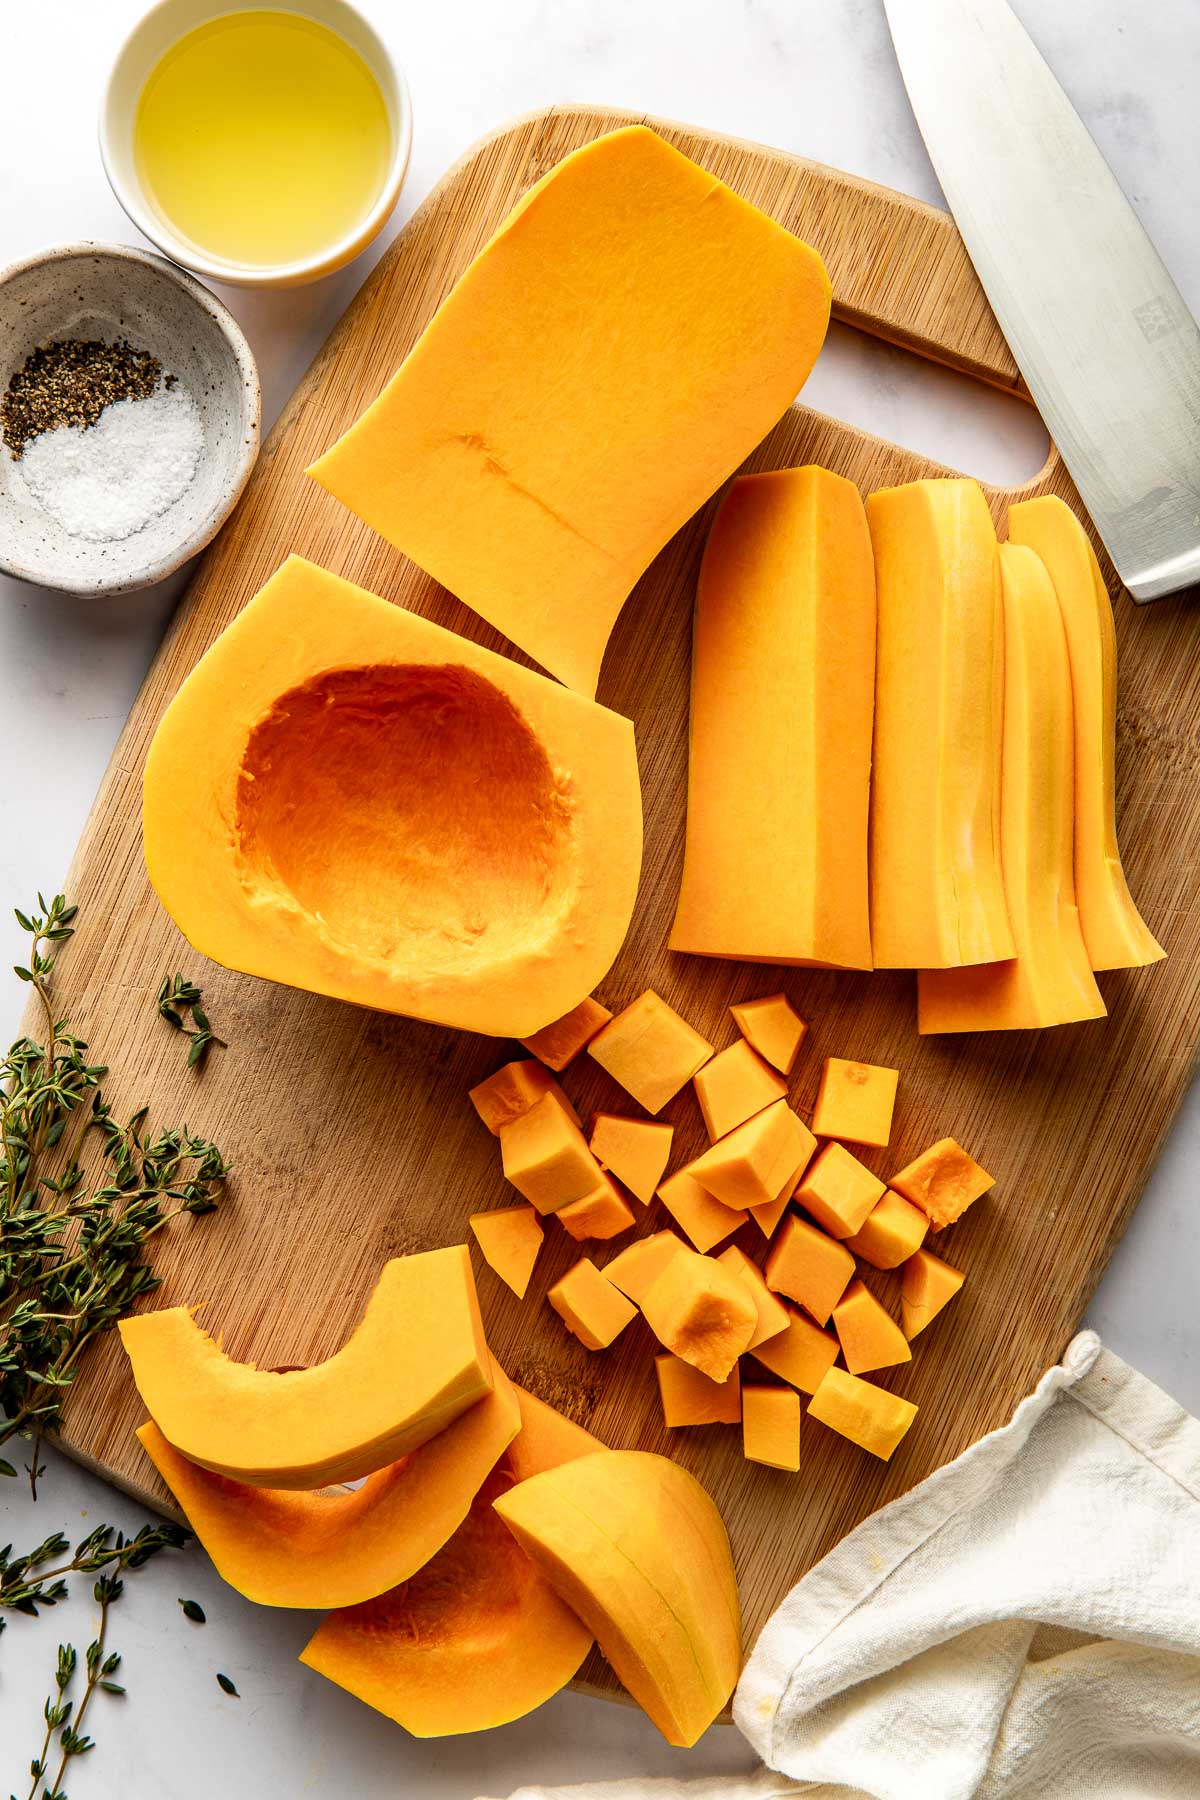
I begin by slicing the neck (the skinnier part or stem end) away from the bulb part of the butternut squash. Then I slice the neck portion into ½- to 1-inch thick planks.
Next, I cut the scooped-out bulb portion in quarters.
Now it’s time to cube the squash. To do so, I cube the bulb pieces first, slicing them into ½- to 1-inch cubes, the best I can. I don’t stress about making perfect cubes. It’s okay if some pieces are awkwardly shaped. They all taste the same in the end. Once cubed, I transfer the pieces to a clean bowl.
To finish, I cube the neck butternut squash planks into ½- to 1-inch cubes as well, and place them in the bowl of raw butternut squash pieces.
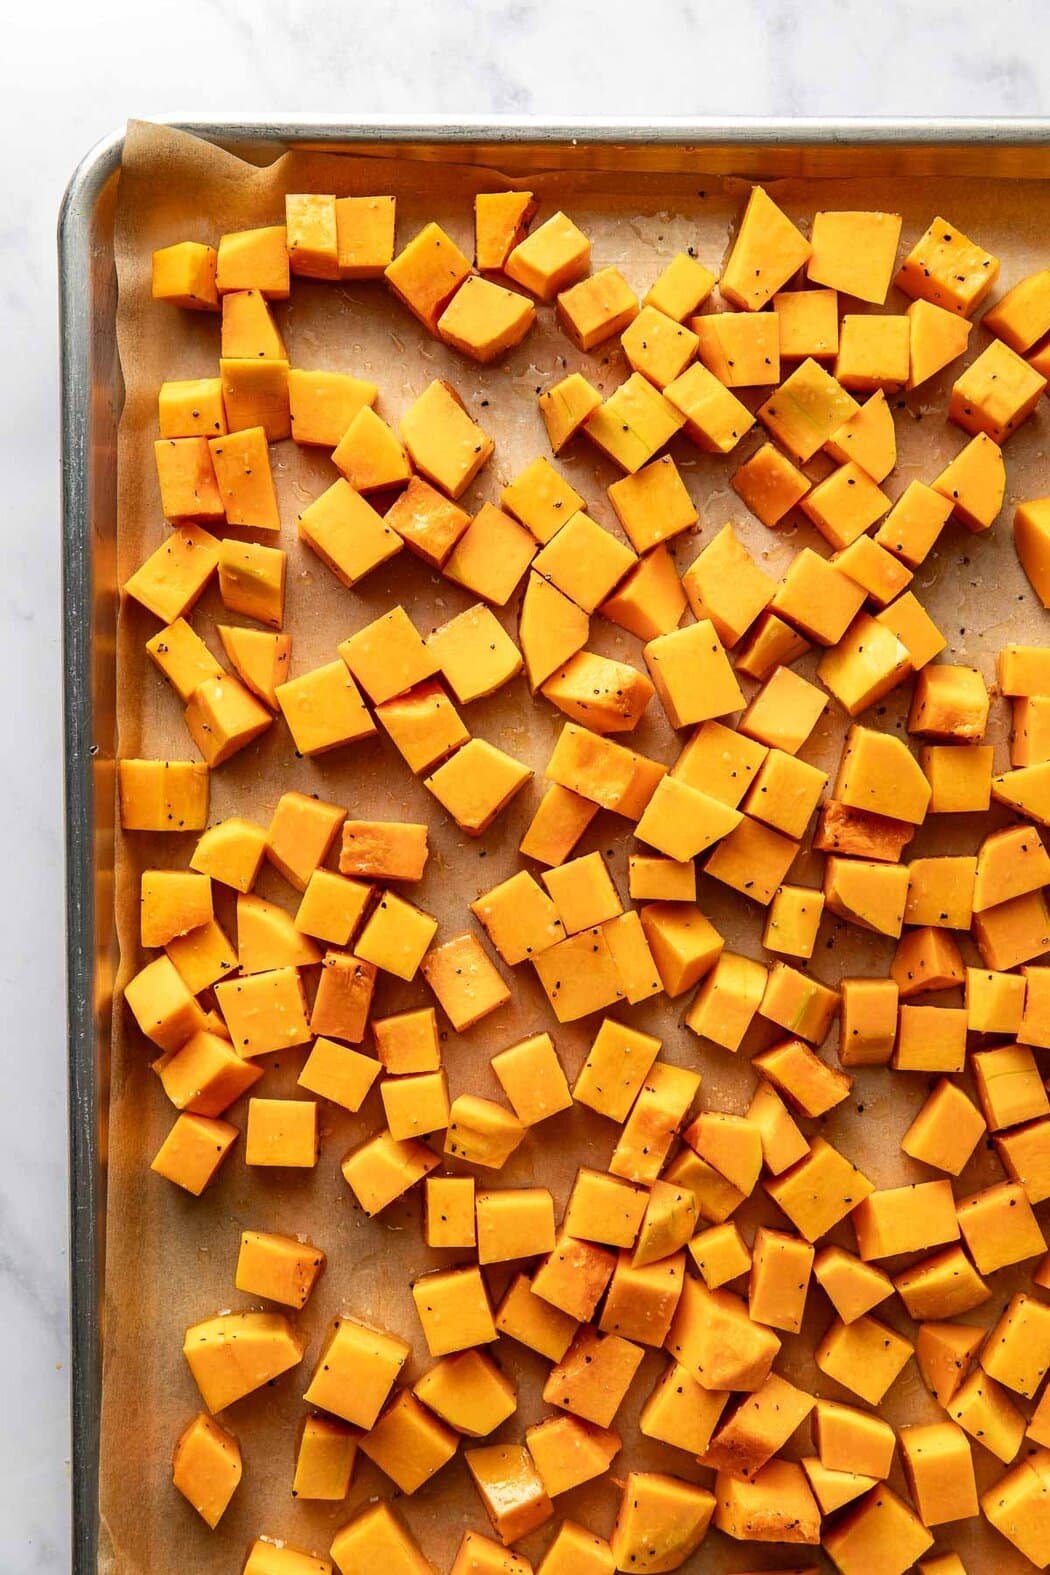
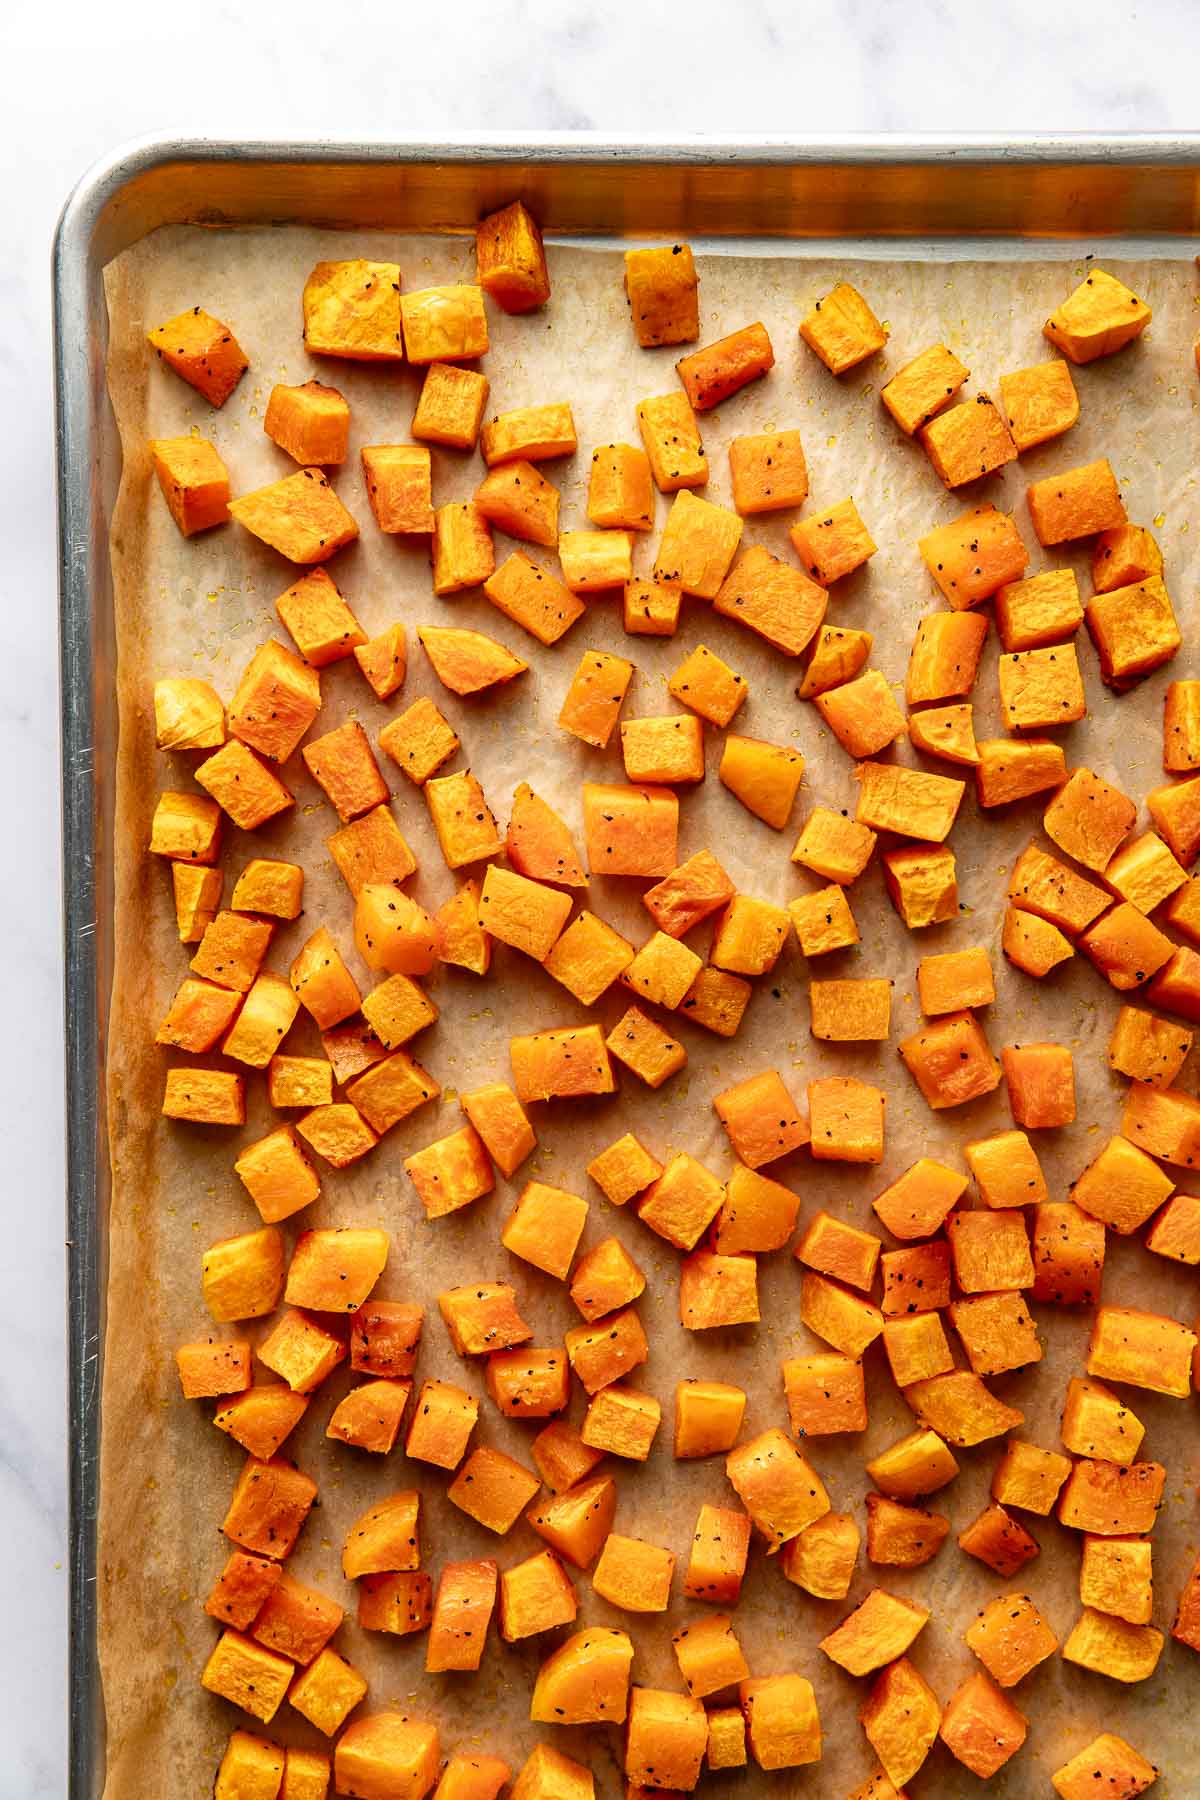
Ready To Roast!
After the winter squash is cut, peeled, and cubed, I typically roast it on a sheet pan or cook it on the stovetop (see instructions below). Then I use it in a variety of side dishes and fall dinner recipes to sneak in extra veggies. Some favorites are my butternut squash home fries, this butternut squash and apple hash, and my harvest salad. I also sometimes use roasted butternut squash cubes as an easy side dish to add nutrient-rich carbohydrates to a meal. Or, I use roasted butternut squash puree as the base for a creamy butternut squash soup.
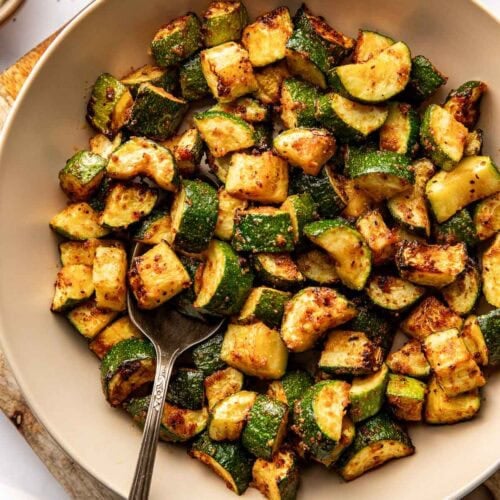
How to Cook Squash on the Stove
Cooking diced butternut squash on the stovetop is one of the easiest (and tastiest) ways to use it, in my opinion. Plus, it’s quick and easy. Here’s an overview of my process:
- Heat oil: Add 1 to 2 tablespoons of olive oil or butter to a large skillet over medium heat.
- Add the squash: Arrange the squash pieces in a single layer. Season them as desired. Salt, pepper, garlic powder, cinnamon, and paprika all make great options.
- Sauté: Cook uncovered until the squash begins to sear slightly. Then, cover the skillet with a lid, and let the squash steam, stirring occasionally, until it’s fork-tender. The cooking time varies based on the size of the squash.
- Caramelize: Remove the lid, and let the squash continue to cook and caramelize for a few minutes, being careful not to burn. Remove the skillet from the heat, and enjoy.
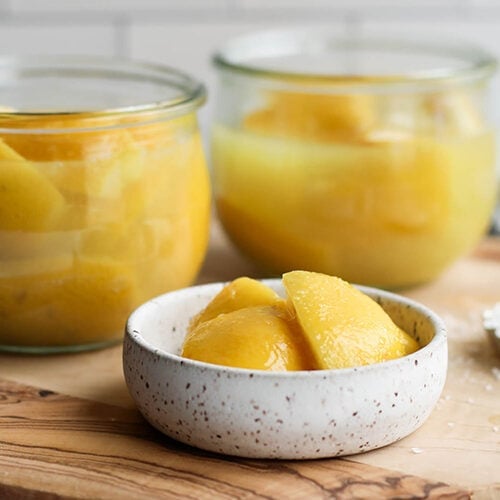
How To Store
When meal prepping, I cube two or three butternut squashes at once to cut down on prep time when cooking later in the week. Once cubed, I transfer the raw squash to an airtight container with a paper towel to soak up any excess moisture. It keeps fresh in the fridge for up to 5 days.
Or, for a longer-lasting option, I spread the uncooked cubes in an even layer on a parchment paper-lined baking sheet and freeze until solid. This typically takes 2 to 3 hours. Once frozen, I transfer the cubes to a freezer-safe container and freeze them for up to 6 months.
Frequently Asked Questions
Yes, if the skin feels too tough to slice through, I poke holes all around the squash and microwave it for 2-3 minutes. This softens the skin just enough to make cutting safer and easier without cooking the flesh. Be sure to let it cool slightly before handling, since the outside can get hot.
The edible part of butternut squash is the orange flesh inside. The seeds can also be roasted and eaten, similar to pumpkin seeds, but the tough outer skin is not good for eating since it’s thick, tough, and bitter.
Look for a squash that is solid beige in color, without green streaks or patches. The skin should be matte and hard. If it’s shiny, it’s likely underripe. A ripe butternut squash will also feel heavy for its size, and the stem should be firm and intact. Avoid squash with soft spots, cuts, or mold. These are signs of overripeness or damage.
More Helpful How-To Tutorials
The photos in this post were taken by Megan McKeehan.
For ultimate success, we highly recommend reading the tips in the full blog post above. All photos and content are copyright protected. Please do not use our photos without prior written permission. If you wish to republish a recipe, please rewrite the recipe in your own unique words. Link back to the source recipe here on The Real Food Dietitians. Thank you!

These are delicious. But mine did not get “crispy”. I even broiled at the end to get them to brown. Could I increase oven temp to 450? Suggestions please.
Hi Deborah,
You can try increasing the oven temperature a bit to see if that works. Some squash can be waterier than others depending on the variety, time of year, location it was grown, how long it’s been stored, etc. which will affect how crispy your cubes get. Mine tend to not get super crispy like a potato would but rather nicely browned on the edges because I grown my own squash and we tend to go through them pretty fast.
Thank you for the cutting tips. I was peeling the whole squash and then cutting( a lot of work). Instead of using a regular spoon ( I’ve bent a few) I now use a metal ice cream scoop. Works like a charm and no more bent spoons!! Keep up the great job !!! I’ve made several of your recipes .
I love the idea of using an ice cream scoop – that’s brilliant! Thanks so much for sharing and for your support.
I’m planning on roasting butternut squash. If I prepare it following your instructions, which I do thank you for, can I do it a day or two ahead? I will put it in the fridge. Or will it turn brown?
It will stay good in an airtight container in the refrigerator, enjoy!